
Want to hook up a Wii Nunchuck to an Arduino but don’t want to cut up the cord on your Nunchuck? Yeah me too. So I made some of these:
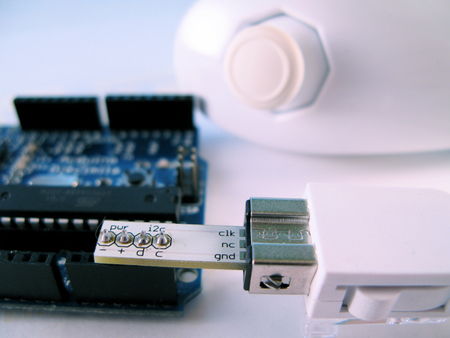
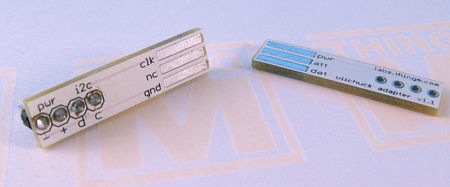
It’s a small PCB that adapts the Wii Nunchuck connector to standard 4-pin header. I call it the “wiichuck adapter”. It plugs directly into the Arduino, no wiring necessary. You can get one too for $4.
Available from the following wonderful shops:
– FunGizmos.com. FREE DOMESTIC SHIPPING. International shipping for $1 more.
– Little Bird Electronics (Australia)
– SparkFun. Ships domestic & internationally. Be sure to order header pins too!
– and just about any SparkFun distributor
One of the coolest things about the Wii (to me) is that the expansion port on the bottom of the Wii remote is an I2C serial connection. This means that anything that plugs into that port can work with microcontrollers like the Arduino or Basic Stamp or others. Of the available peripherals, the Wii Nunchuck is one of the best. It contains a 3-axis accelerometer, a 2-axis joystick, and two buttons. Hooking up a Wii Nunchuck to Arduino is easy and I have class notes describing how to do it. But cutting off the connector of the Nunchuck to get at the wires is a little drastic.
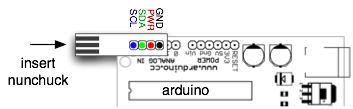
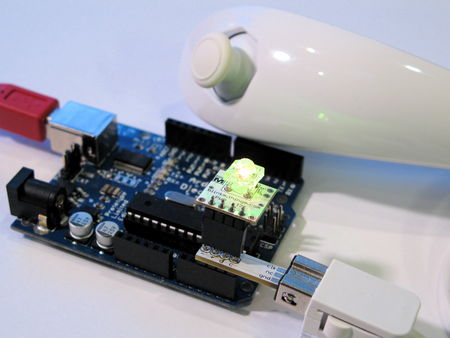
This “wiichuck adapter” let’s you play with the Wii Nunchuck and other Wii remote peripherals without needing you to cut cables. Just plug it into the Wii Nunchuck, then into the Arduino, in to Analog In pins 2,3,4,5. Pins 4&5 are the I2C communication pins and Pins 2&3 can act as the power supply for the Nunchuck.
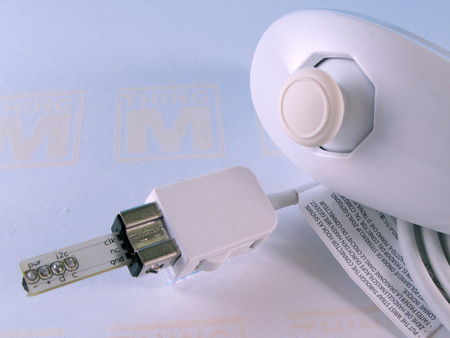
This is what it looks like plugged into the Nunchuck by itself.
Nunchuck and Other I2C Devices (like BlinkM)
You can use other I2C devices at the same time as the Nunchuck. The I2C bus allows for multiple devices. For instance, if you have a BlinkM and also want to use a Nunchuck, no problem. The pinout of the BlinkM and the wiichuck adpater are the same. Just solder a little 4-pin socket header to the top of the wiichuck adapter.
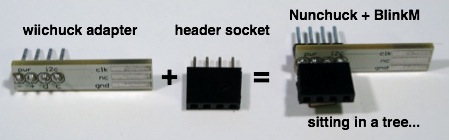
And then you can plug in a BlinkM right on top.
Software
To make it a little easier to play with the Nunchuck, I made a little Nunchuck library for Arduino and demo:
– nunchuck_funcs.h
– WiichuckDemo.ino
(Or better yet, check out the github repository for it all zipped up. Just unzip and open the .ino in Arduino)
It is based off the original research done by Chad Philips of Windmeadow Labs. The library uses the Wiring I2C library called “Wire”. This library is built-in to Arduino, as long as you have the latest Arduino development environment (0010 currently). To see another Arduino sketch using this library, you can check out the BlinkMChuck example that’s part of the BlinkM examples.
The library functions are:
– nunchuck_setpowerpins() — power up a nunchuck plugged directly into an Arduino on analog pins 2,3,4,5.
– nunchuck_init() — init a nunchuck connected to an Arduino
– nunchuck_get_data() — get a data packet from the Nunchuck
Then you can get at the data packet using various helper functions like:
– nunchuck_accelx() — get X-axis acceleration
– nunchuck_zbutton() — get Z-button state
– …and so on, see the header file for a complete list
Nunchuck Information
– Wiimote/Extension Controllers/Nunchuk — info page about the Nunchuck on WiiLi (Linux for Wii) site
– “Wiimote Accessory Bus” — docs about the Nunchuck’s connector.
Getting One / How to Order
Available from the following wonderful shops:
– FunGizmos.com. International shipping for $1 more.
– Tinker.it (UK)
– Little Bird Electronics (Australia)
Update 20 Feb 2008: Over 200 wiichuck adapters sold to more than 50 people in 5 countries. I still have some available if anyone wants one. To those who ordered up to now, you’ll be getting them in the post in a few days.
Update 29 Feb 2008: Over 300 wiichuck adapters sold and I still have many more left. Get yours if you want one. :-) Anyone that’s ordered before today should receive their adapters via first class post soon. I’ll be unable to mail out any orders for the first week of March.
Update 24 Mar 2008: I still have several left. If you’re in AU, you can also get the adapter kit from Little Bird Electronics.
Update 11 Apr 2008: Updated the nunchuck_funcs.h library to easily work with a nunchuck plugged directly into an Arduino by adding a nunchuck_init_with_power() function (see comments below). Also, I still have several adapter kits for sale.
Update 6 May 2008: All Out! But I’ll be doing another board run in a few days and will update here when I have more available.
Update 8 Jun 2008: FunGizmos.com is now carrying Wiichuck adapters! They also have lots of other cool things, like BlinkMs. :-)
Update 7 Jan 2009: Both FunGizmos.com (US) and Tinker.It(UK) carry the Wiichuck adapter.
Update 31 Mar 2009: Fixed small bug that made it not compile under more recent Arduino, and fixed links. Also: if you’re having problems getting this to work, in the Arduino software, go to the “Boards” menu, switch to a different Arduino board type, compile, then switch back to your type. This forces a recompile of the Arduino I2C/TWI library that sometimes doesn’t get compiled correctly.
Update 18 Feb 2010: Updated API description to note that “nunchuck_init_with_power()” was removed in favor of “nunchuck_setpowerpins(); nunchuck_init();”.
Update 6 Dec 2011: Updated to work with Arduino 1.0 (still works with Arudino 0023 too). Changed download links to github repository.
Hi,
When compiling the code I get the error avr-gcc: create process so such file or directory. I am currently using arduino 0017 and I am fairly sure it has something to do with where I placed the nunchuck_funcs.H/Wiichuckdemo.pde. I put the files in the hardware>libraries of it. Is this where it is meant to go or am I having a different error?
Hi Carlo,
The Arduino sketch you have prints out several values from the nunchuck, with text labels, while your Processing sketch looks only for a single value. You need to either change the Arduino sketch so it only outputs a single value or change your Processing sketch to parse the multi-valued output from Arduino. Changing the Arduino sketch is easiest. In your Arduino sketch, make the “loop()” function look like this:
void loop()
{
  nunchuck_get_data();
  Serial.print(accel_x_axis, BYTE);
  delay(100);
}
This will send a series of single bytes, representing the X-axis tilt of the nunchuck, to your Processing sketch.
hello, first of all many thanks for you very good site , where I started approaching to this wonderfoul project, I am a musician but I love tecnology , so ,I’m trying to connect and make “talk” nunchunck and arduino and processing , but (sigh!) something doesn’t work ..I have arduino working on com port 11 that is read as “3”
and connect ground to pin 2 power to 3 data to 4 and clock to 5.
I use this sketch for arduino
/*
 * 2007 Tod E. Kurt, http://todbot.com/blog/
 */

#include

void setup()
{
  Serial.begin(19200);
  nunchuck_setpowerpins(); // use analog pins 2&3 as fake gnd & pwr
  nunchuck_init(); // send the initilization handshake
  Serial.print ("Finished setup\n");
}

void loop()
{
  nunchuck_get_data();
  nunchuck_print_data();
  delay(100);
}


//
// Nunchuck functions
//

static uint8_t nunchuck_buf[6];   // array to store nunchuck data,

// Uses port C (analog in) pins as power & ground for Nunchuck
static void nunchuck_setpowerpins()
{
#define pwrpin PORTC3
#define gndpin PORTC2
    DDRC |= _BV(pwrpin) | _BV(gndpin);
    PORTC &=~ _BV(gndpin);
    PORTC |=  _BV(pwrpin);
    delay(100);  // wait for things to stabilize
}

// initialize the I2C system, join the I2C bus,
// and tell the nunchuck we're talking to it
void nunchuck_init()
{
  Wire.begin();	                // join i2c bus as master
  Wire.beginTransmission(0x52);	// transmit to device 0x52
  Wire.send(0x40);		// sends memory address
  Wire.send(0x00);		// sends sent a zero.
  Wire.endTransmission();	// stop transmitting
}

// Send a request for data to the nunchuck
// was "send_zero()"
void nunchuck_send_request()
{
  Wire.beginTransmission(0x52);	// transmit to device 0x52
  Wire.send(0x00);		// sends one byte
  Wire.endTransmission();	// stop transmitting
}

// Receive data back from the nunchuck,
int nunchuck_get_data()
{
    int cnt=0;
    Wire.requestFrom (0x52, 6);	// request data from nunchuck
    while (Wire.available ()) {
      // receive byte as an integer
      nunchuck_buf[cnt] = nunchuk_decode_byte(Wire.receive());
      cnt++;
    }
    nunchuck_send_request();  // send request for next data payload
    // If we recieved the 6 bytes, then go print them
    if (cnt >= 5) {
     return 1;   // success
    }
    return 0; //failure
}

// Print the input data we have recieved
// accel data is 10 bits long
// so we read 8 bits, then we have to add
// on the last 2 bits.  That is why I
// multiply them by 2 * 2
void nunchuck_print_data()
{
  static int i=0;
  int joy_x_axis = nunchuck_buf[0];
  int joy_y_axis = nunchuck_buf[1];
  int accel_x_axis = nunchuck_buf[2]; // * 2 * 2;
  int accel_y_axis = nunchuck_buf[3]; // * 2 * 2;
  int accel_z_axis = nunchuck_buf[4]; // * 2 * 2;

  int z_button = 0;
  int c_button = 0;

  // byte nunchuck_buf[5] contains bits for z and c buttons
  // it also contains the least significant bits for the accelerometer data
  // so we have to check each bit of byte outbuf[5]
  if ((nunchuck_buf[5] >> 0) & 1)
    z_button = 1;
  if ((nunchuck_buf[5] >> 1) & 1)
    c_button = 1;

  if ((nunchuck_buf[5] >> 2) & 1)
    accel_x_axis += 2;
  if ((nunchuck_buf[5] >> 3) & 1)
    accel_x_axis += 1;

  if ((nunchuck_buf[5] >> 4) & 1)
    accel_y_axis += 2;
  if ((nunchuck_buf[5] >> 5) & 1)
    accel_y_axis += 1;

  if ((nunchuck_buf[5] >> 6) & 1)
    accel_z_axis += 2;
  if ((nunchuck_buf[5] >> 7) & 1)
    accel_z_axis += 1;

  Serial.print(i,DEC);
  Serial.print("\t");

  Serial.print("joy:");
  Serial.print(joy_x_axis,DEC);
  Serial.print(",");
  Serial.print(joy_y_axis, DEC);
  Serial.print("  \t");

  Serial.print("acc:");
  Serial.print(accel_x_axis, DEC);
  Serial.print(",");
  Serial.print(accel_y_axis, DEC);
  Serial.print(",");
  Serial.print(accel_z_axis, DEC);
  Serial.print("\t");

  Serial.print("but:");
  Serial.print(z_button, DEC);
  Serial.print(",");
  Serial.print(c_button, DEC);

  Serial.print("\r\n");  // newline
  i++;
}

// Encode data to format that most wiimote drivers except
// only needed if you use one of the regular wiimote drivers
char nunchuk_decode_byte (char x)
{
  x = (x ^ 0x17) + 0x17;
  return x;
}
———————————–
——————————–
and this for proccessing
import processing.serial.*;
Serial myPort;
int serial = 1;
PFont font;
int numH = 370;

void setup () {
  size(270, 440);
  println(Serial.list());
  myPort = new Serial(this, Serial.list()[3], 19200);
  // Load the font. Fonts must be placed within the data
  // directory of your sketch. Use Tools > Create Font
  // to create a distributable bitmap font.
  // For vector fonts, use the createFont() function.

  font = loadFont("Arial-Black-48.vlw");
  smooth();
}

void draw () {
  background(255);

  if (myPort.available() > 0) {
    serial = myPort.read();
    serialEvent();
  }

  line(70,70,70,370);
  line(70,370,200,370);
  fill(0);
  textFont(font, 11);
  text("Sensor\nValue",22,80);
  text("Analog Input", 95, 390);
  text(serial,25,110);
  noFill();
}

void serialEvent(){
  if(serial>1){
  rect(120,numH-serial, 20, serial);
  }
}
where am I wrong?
manythanks
Buy it nunchuck: http://www.dealextreme.com/details.dx/sku.14236, but I can not work with the Arduino Mega I have successfully connected to its terminals 20 and 21 of the arduino and the file nunchuck_funcs.h in the same directory, but I always have several value: accx: 255 ACCY: 255 zbut: 0 cbut: 0 and does not change, if I disconnect the nunchuck passes of 255 to 0 … The nunchuck does not support ???… A greeting
Alright, I have got it. My board was faulty from before.
Thanks for the guide Tod! Also for sharing your servo nunchuck codes. :D
You have a big heart.
Hi Eppan,
Yes, you can hook up a Wiichuck to a Lilypad. The Wiichuck adapter and BlinkM have the same pinout, so you can use this diagram of connecting a Lilypad to a BlinkM.
Connecting multiple Wiichucks to a single Arduino is more complex. Search either the comments on my site or on Windmeadow’s site to see what others have done. (also, I think there is some discussion in the Arduino forums on doing this).
Does this also work with latest Lilypad, if connected to analog 4 & 5 pins? Is it possible to hook two of these nunchucks to same board?
With BlinkMChuck there is the same Problem with “static void nunchuck_init_with_power()”. You must comment out this function to work.
I use Arduino 0018.
http://i118.photobucket.com/albums/o102/bluealf/serialprintlog.jpg
is it supposed to show tat way??
pls enlighten me guys :D
Thanks a bunch! I finally got it working. I realized the main problem was I was using a Nyko Kama wireless Nunchuck and for some reason that doesn’t work. When I had the wireless chuck plugged in I could only get a bunch of zeros(when it was off) and then 255 when it was on for the x and y accelerations. Once I plugged in a wired chuck everything worked perfectly.
I was wondering if anyone has come up with a solution to the wireless chuck problem. I would like to use the wireless chuck so that I can build a remote controlled robot for one of my classes.
Also, do you know how the WiiChuck class works from the Arduino Playground? I’ve been trying to play around with that as well but I’m having some trouble. Thanks again for all the assistance and the great library! :)
Oh, I see what the problem is now. The “nunchuck_init_with_power()” function was removed from the nunchuck_funcs.h library.
Instead, do “nunchuck_setpowerpins(); nunchuck_init();” to accomplish the same thing. (This is what the WiichuckDemo sketch is already doing)
There was confusion about the “_with_power()” variant so I removed it. But it looks like I didn’t update this post with those changes. Sorry about that. I’ll fix it now.
Tod,
nunchuck_funcs.h is in the same directory as the WiiChuckDemo.pde. I can get it to compile if I use nunchuck_init() but not when I use nunchuck_init_with_power(). For now I am just trying to see how to manipulate the different aspects of the nunchuck so that I can later adapt it to different applications. Once I can get the data to print to the Serial communicator I can replace those printlns with something else. For now, though, I can’t even get to that step.
Jake, you also need to download the “nunchuck_funcs.h” file and put it in the same directory WiiChuckDemo.pde.
Hey,
I have a quick question. I try using the nunchuck_init_with_power() function but i get this error:
In function ‘void setup()’:
error: ‘nunchuck_init_with_power’ was not declared in this scope
I am just using the WiichuckDemo from this site so I am confused on what is going wrong. Here is the total program:
/* * WiiChuckDemo -- * * 2008 Tod E. Kurt, http://thingm.com/ * */ #include #include "nunchuck_funcs.h" int loop_cnt=0; byte accx,accy,zbut,cbut; int ledPin = 13; void setup() { Serial.begin(9600); nunchuck_setpowerpins(); nunchuck_init_with_power(); // send the initilization handshake Serial.print("WiiChuckDemo ready\n"); } void loop() { if( loop_cnt > 100 ) { // every 100 msecs get new data loop_cnt = 0; nunchuck_get_data(); accx = nunchuck_accelx(); // ranges from approx 70 - 182 accy = nunchuck_accely(); // ranges from approx 65 - 173 zbut = nunchuck_zbutton(); cbut = nunchuck_cbutton(); Serial.print("accx: "); Serial.print((byte)accx,DEC); Serial.print("\taccy: "); Serial.print((byte)accy,DEC); Serial.print("\tzbut: "); Serial.print((byte)zbut,DEC); Serial.print("\tcbut: "); Serial.println((byte)cbut,DEC); } loop_cnt++; delay(1); }hey guys, yeah, i only got the serial.print program to work in the Arduino IDE 0017… only if using 9600 baud rate.
but it’s kinda messy. take a look.
http://i118.photobucket.com/albums/o102/bluealf/serialprintlog.jpg
is it supposed to show tat way?