Want to hook up a Wii Nunchuck to an Arduino but don’t want to cut up the cord on your Nunchuck? Yeah me too. So I made some of these:


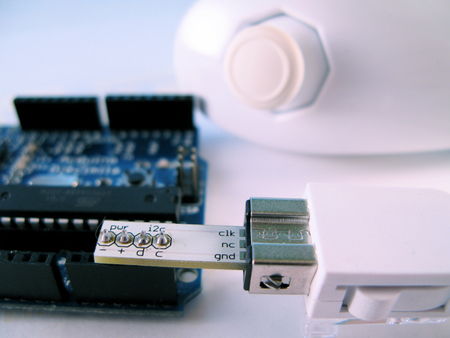
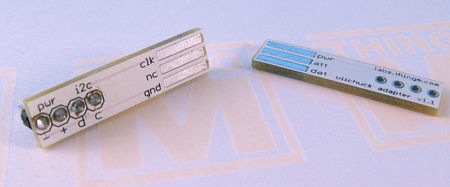
It’s a small PCB that adapts the Wii Nunchuck connector to standard 4-pin header. I call it the “wiichuck adapter”. It plugs directly into the Arduino, no wiring necessary. You can get one too for $4.
Available from the following wonderful shops:
– FunGizmos.com. FREE DOMESTIC SHIPPING. International shipping for $1 more.
– Little Bird Electronics (Australia)
– SparkFun. Ships domestic & internationally. Be sure to order header pins too!
– and just about any SparkFun distributor
One of the coolest things about the Wii (to me) is that the expansion port on the bottom of the Wii remote is an I2C serial connection. This means that anything that plugs into that port can work with microcontrollers like the Arduino or Basic Stamp or others. Of the available peripherals, the Wii Nunchuck is one of the best. It contains a 3-axis accelerometer, a 2-axis joystick, and two buttons. Hooking up a Wii Nunchuck to Arduino is easy and I have class notes describing how to do it. But cutting off the connector of the Nunchuck to get at the wires is a little drastic.
This “wiichuck adapter” let’s you play with the Wii Nunchuck and other Wii remote peripherals without needing you to cut cables. Just plug it into the Wii Nunchuck, then into the Arduino, in to Analog In pins 2,3,4,5. Pins 4&5 are the I2C communication pins and Pins 2&3 can act as the power supply for the Nunchuck.

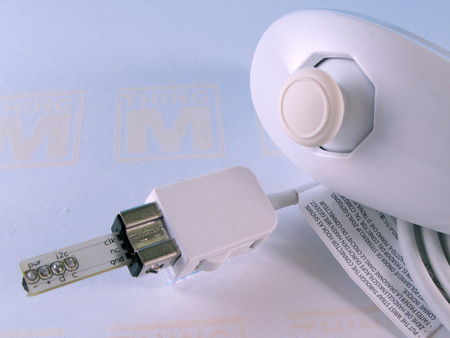
This is what it looks like plugged into the Nunchuck by itself.

Nunchuck and Other I2C Devices (like BlinkM)
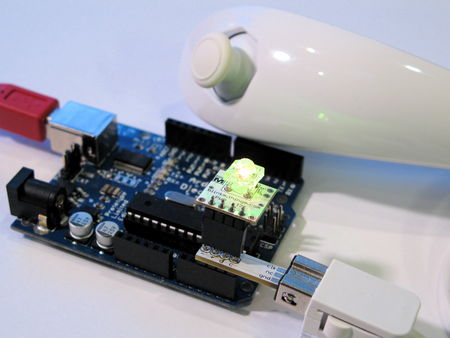
You can use other I2C devices at the same time as the Nunchuck. The I2C bus allows for multiple devices. For instance, if you have a BlinkM and also want to use a Nunchuck, no problem. The pinout of the BlinkM and the wiichuck adpater are the same. Just solder a little 4-pin socket header to the top of the wiichuck adapter.

And then you can plug in a BlinkM right on top.

Software
To make it a little easier to play with the Nunchuck, I made a little Nunchuck library for Arduino and demo:
– nunchuck_funcs.h
– WiichuckDemo.ino
(Or better yet, check out the github repository for it all zipped up. Just unzip and open the .ino in Arduino)
It is based off the original research done by Chad Philips of Windmeadow Labs. The library uses the Wiring I2C library called “Wire”. This library is built-in to Arduino, as long as you have the latest Arduino development environment (0010 currently). To see another Arduino sketch using this library, you can check out the BlinkMChuck example that’s part of the BlinkM examples.
The library functions are:
– nunchuck_setpowerpins() — power up a nunchuck plugged directly into an Arduino on analog pins 2,3,4,5.
– nunchuck_init() — init a nunchuck connected to an Arduino
– nunchuck_get_data() — get a data packet from the Nunchuck
Then you can get at the data packet using various helper functions like:
– nunchuck_accelx() — get X-axis acceleration
– nunchuck_zbutton() — get Z-button state
– …and so on, see the header file for a complete list
Nunchuck Information
– Wiimote/Extension Controllers/Nunchuk — info page about the Nunchuck on WiiLi (Linux for Wii) site
– “Wiimote Accessory Bus” — docs about the Nunchuck’s connector.
Getting One / How to Order
Available from the following wonderful shops:
– FunGizmos.com. International shipping for $1 more.
– Tinker.it (UK)
– Little Bird Electronics (Australia)
Update 20 Feb 2008: Over 200 wiichuck adapters sold to more than 50 people in 5 countries. I still have some available if anyone wants one. To those who ordered up to now, you’ll be getting them in the post in a few days.
Update 29 Feb 2008: Over 300 wiichuck adapters sold and I still have many more left. Get yours if you want one. :-) Anyone that’s ordered before today should receive their adapters via first class post soon. I’ll be unable to mail out any orders for the first week of March.
Update 24 Mar 2008: I still have several left. If you’re in AU, you can also get the adapter kit from Little Bird Electronics.
Update 11 Apr 2008: Updated the nunchuck_funcs.h library to easily work with a nunchuck plugged directly into an Arduino by adding a nunchuck_init_with_power() function (see comments below). Also, I still have several adapter kits for sale.
Update 6 May 2008: All Out! But I’ll be doing another board run in a few days and will update here when I have more available.
Update 8 Jun 2008: FunGizmos.com is now carrying Wiichuck adapters! They also have lots of other cool things, like BlinkMs. :-)
Update 7 Jan 2009: Both FunGizmos.com (US) and Tinker.It(UK) carry the Wiichuck adapter.
Update 31 Mar 2009: Fixed small bug that made it not compile under more recent Arduino, and fixed links. Also: if you’re having problems getting this to work, in the Arduino software, go to the “Boards” menu, switch to a different Arduino board type, compile, then switch back to your type. This forces a recompile of the Arduino I2C/TWI library that sometimes doesn’t get compiled correctly.
Update 18 Feb 2010: Updated API description to note that “nunchuck_init_with_power()” was removed in favor of “nunchuck_setpowerpins(); nunchuck_init();”.
Update 6 Dec 2011: Updated to work with Arduino 1.0 (still works with Arudino 0023 too). Changed download links to github repository.

Hi Chandler,
Yup, but it won’t just plug in, like on the Arduino, because of how the BareBones Board deviates from the standard Arduino pin layout. You would wire it up like a BlinkM, which is shown here:
http://www.flickr.com/photos/todbot/3461898602/
Can you use it with the barebones board??
Hi Bradley,
I just verified the WiichuckDemo still works for me, using a Nunchuck purchased about a year ago, a Arduino Diecimila with an ATmega168, and Arduino 0016 on Mac OS X.
I would recheck your solder connections, with a multimeter if you have one. If you’d like to take a few pictures of your adapter (both sides) and your Arduino (top & bottom) and post a link to them here, I’d be glad to look at it and see if I can see anything wrong.
Also, if you have a potentiometer or other analog sensor, you could try loading up the AnalogInput example, and try each of the analog pins 2,3,4,5 to verify they still work as inputs. This will let you know if those four pins are still working on your Arduino.
Tod- The nunchuck was purchased last August, I believe. I know the analog pins 4 and 5 are functional because I can drive a BlinkM using them. The only thing I can think of at the moment is if I could have done something wrong in soldering the pins to the adapter, but it looks clean to me. I’ll continue investigating on my end to see if I messed something up. – BPA
Hmm, that’s really weird. Is this a recently purchased Nunchuck? Maybe Nintendo changed how the Nunchuck works a little and it screws up our hacks.
Tod- FWIW, I’m having exactly the same experience as Johnny. I’m using a Duemilanove with ATMega328, Arduino 0016, WiichuckDemo code, toggled the Board selection as per the 3/31 update, tried both plugging into the 2/3/4/5 pins as well as plugging it into a breadboard configured in the manner of Jang-Soo above. Regular Nintendo Nunchuck known to be functional and plugged into the adapter correctly, no solder bridging on the adapter or the Arduino. – cheers and TIA, BPA
Hmmm. Not sure what’s going on. Make sure the nunchuck is plugged in to the adapter exactly as in the pictures above: the “divot” of the metal part of the nunchuck connector is on the same side as the “pwr” & “i2c” labels on the adapter.
Then, make sure the adapter is plugged into Analog In pins 2,3,4,5.
Then, make sure you’re using the WiichuckDemo code above (which I think you are from your previous comment, but this is for others who may be reading this)
And just to be sure, this is a regular nunchuck from Nintendo, correct? We’ve not been able to get wireless nunchucks working yet.
Hi,
Thx for your quick reply. Yes i am using 0016 and also tried to switch and compile for an other board and go back + compile to the arduino board Duemilanove but without more success unfortunately.
The strange thing is that everything looks fine. I can see because of the diodes, that the code is downloaded to the board. I am a bit disapointed because i’ve created an other program with processing in order ot interact with the nunchuck but because this the arduino code doesn’t work as it should be, i cannot continue my project.
Otherwise, the nunchuck is connected to the arduino via the small adapter on the nunchuck + a socket between the nunchuck and the board. looks similar to your pictures above.
Thanks again for your help
Johnny Baillargeaux (from france)
Hi Johnny,
How is the Nunchuck wired up to the Arduino? Also, make sure you’ve got the latest version of the Arduino software (0016 is latest right now), and try the “Boards” menu thing described above under the “Update 31 Mar 2009”
Hi,
I uploaded your code on the arduino, unfortunately, the values sent by my nunchuck never change even when i move a lot, the nunchuck.
WiiChuckDemo ready
accx: 0 accy: 0 zbut: 1 cbut: 1
accx: 0 accy: 0 zbut: 1 cbut: 1
accx: 0 accy: 0 zbut: 1 cbut: 1
accx: 0 accy: 0 zbut: 1 cbut: 1
accx: 0 accy: 0 zbut: 1 cbut: 1
Any ideas on what’s wrong ?
Thanks any advance for your help.
Johnny Baillargeaux (from france)
oops typo.. +2G should be around 229, not 129
Just started playing around with my wiichuck. I’m amazed by the accuracy of this device. I’m collecting about 800 samples every 2.5 seconds and only seeing a difference of between 1-3 between the min and max values, when the nunchuck is stationary!
I’m interested in equating the 8 bit value to a G force. Based on http://www.wiili.org/index.php/Wiimote/Extension_Controllers/Nunchuk it seems that difference of 1G equates to about 53. For example:
x axis Min(at -1G):0x48 (72) / Medium(at 0G):0x7D (125) / Max(at 1G):0xB0 (176)
So given this scale is it safe to assume that -2G is around
19, and +2G is around 129? Even though this is supposedly a 2G accelerometer, I can easily get values of 0 and 255 by shaking the nunchuck, which I will assume to be inaccurate past 2G.
I’m interested in building a device using the nunchuck to record and transmit the g-forces as I drive my car around a track.
Thanks for sharing your work on this.
Hi
I’ve adapted your code – using some code from ‘Making things talk’ as a reference, and some additional bodging in Python – and completed my first proper Arduino project: using the Wii-nunchuck for mouse input (I’ve added a link to a description as my ‘website’). I opted for a ‘call and response’ approach to handling data-flow and that seems to work fairly well… in fact I was able to remove the delay and counter from your code as it no longer seemed necessary. Tom Igoe suggests that whilst this approach may seem slower it should actually be more efficient. I haven’t put this to the test: I’m just happy that it works at all :)
Thanks again for providing this really helpful resource!
Yup, the “nunchuck_funcs.h” library above has the functions
nunchuck_joyx()andnunchuck_joyy().Hey Todd,
Is there a way to get readings from the joystiq part of the wiichuck?
Mine was not working until I changes the serial port from whatever it was to 9600.
Serial.begin(9600);
Just thought I’d share in case someone else has the same problem. It might have something to do with the new Arduino software.
Anyhooo…
Thanks Todd.
Great little hack.
Hi blindfish,
This is a fine place to ask that question. The answer to why is there a delay() in there is mostly to reduce calls to Serial.print() but also because I think I had some issues with it hanging too.
The code we all use to talk to the Nunchuck is a reverse-engineering of the protocol it speaks, and we’re not quite sure if it’s fully correct. That and we’re driving the Nunchuck at 5V instead of its designed 3.3V. And we’re not using proper pullup resistors on the SDA & SCL lines. And then there’s the possibility that the Arduino Wire I2C library might have a few bugs in it when used with the Nunchuck. I’m kind of surprised it works at all. ;)
If you have two 4.7k resistors available, try wiring up a breadboard where you have one resistor going from the SDA pin (aka “d” on the wiichuck adpater) going to 5V and another resistor going from the SCL pin (aka “c”) to 5V. This adds proper pullup resistors to the little I2C bus between the Arduino and the Nunchuck, and should allow you to run it faster. Or it might blow out your Nunchuck. (again, smiley face :)
This is a neat bit of kit and a handy guide, but I have one quick question about the WiichuckDemo code. You’ve used a counter and condition to reduce the rate at which data is accessed. Is there any particular reason for doing this? I’m assuming it was just to reduce the amount of calls to Serial.print.
I’ve hooked up my nunchuk to a servo and with the condition in place it’s pretty jerky, but without it it’s reasonably smooth – both using the joystick and accelerometers. However with the latter the board seems to hang every so often so I was wondering whether the condition was important.
Sorry if this isn’t the best place to be asking the question.
Hey don’t feel bad, having multiples files in one Arduino sketch is a fairly advanced techniques that trips a lot of people up. And I didn’t call attention to it as much as I should.