
Want to hook up a Wii Nunchuck to an Arduino but don’t want to cut up the cord on your Nunchuck? Yeah me too. So I made some of these:
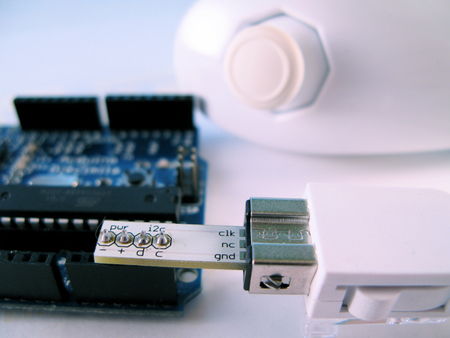
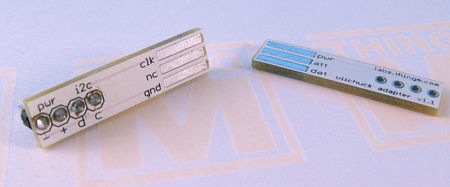
It’s a small PCB that adapts the Wii Nunchuck connector to standard 4-pin header. I call it the “wiichuck adapter”. It plugs directly into the Arduino, no wiring necessary. You can get one too for $4.
Available from the following wonderful shops:
– FunGizmos.com. FREE DOMESTIC SHIPPING. International shipping for $1 more.
– Little Bird Electronics (Australia)
– SparkFun. Ships domestic & internationally. Be sure to order header pins too!
– and just about any SparkFun distributor
One of the coolest things about the Wii (to me) is that the expansion port on the bottom of the Wii remote is an I2C serial connection. This means that anything that plugs into that port can work with microcontrollers like the Arduino or Basic Stamp or others. Of the available peripherals, the Wii Nunchuck is one of the best. It contains a 3-axis accelerometer, a 2-axis joystick, and two buttons. Hooking up a Wii Nunchuck to Arduino is easy and I have class notes describing how to do it. But cutting off the connector of the Nunchuck to get at the wires is a little drastic.
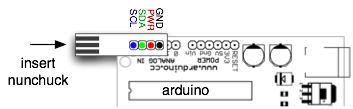
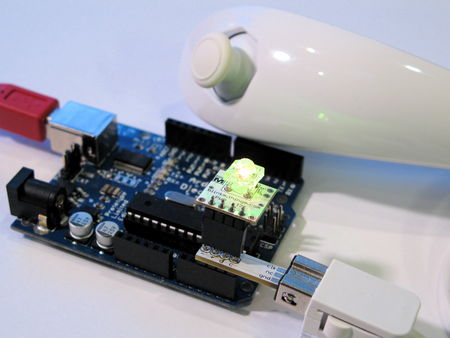
This “wiichuck adapter” let’s you play with the Wii Nunchuck and other Wii remote peripherals without needing you to cut cables. Just plug it into the Wii Nunchuck, then into the Arduino, in to Analog In pins 2,3,4,5. Pins 4&5 are the I2C communication pins and Pins 2&3 can act as the power supply for the Nunchuck.
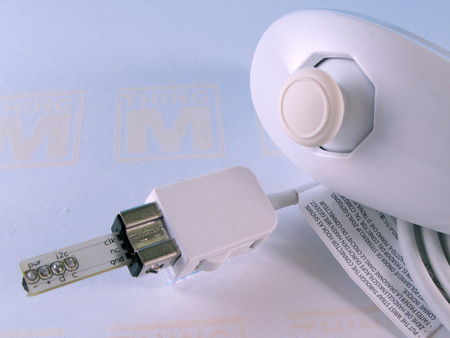
This is what it looks like plugged into the Nunchuck by itself.
Nunchuck and Other I2C Devices (like BlinkM)
You can use other I2C devices at the same time as the Nunchuck. The I2C bus allows for multiple devices. For instance, if you have a BlinkM and also want to use a Nunchuck, no problem. The pinout of the BlinkM and the wiichuck adpater are the same. Just solder a little 4-pin socket header to the top of the wiichuck adapter.
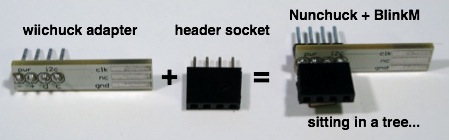
And then you can plug in a BlinkM right on top.
Software
To make it a little easier to play with the Nunchuck, I made a little Nunchuck library for Arduino and demo:
– nunchuck_funcs.h
– WiichuckDemo.ino
(Or better yet, check out the github repository for it all zipped up. Just unzip and open the .ino in Arduino)
It is based off the original research done by Chad Philips of Windmeadow Labs. The library uses the Wiring I2C library called “Wire”. This library is built-in to Arduino, as long as you have the latest Arduino development environment (0010 currently). To see another Arduino sketch using this library, you can check out the BlinkMChuck example that’s part of the BlinkM examples.
The library functions are:
– nunchuck_setpowerpins() — power up a nunchuck plugged directly into an Arduino on analog pins 2,3,4,5.
– nunchuck_init() — init a nunchuck connected to an Arduino
– nunchuck_get_data() — get a data packet from the Nunchuck
Then you can get at the data packet using various helper functions like:
– nunchuck_accelx() — get X-axis acceleration
– nunchuck_zbutton() — get Z-button state
– …and so on, see the header file for a complete list
Nunchuck Information
– Wiimote/Extension Controllers/Nunchuk — info page about the Nunchuck on WiiLi (Linux for Wii) site
– “Wiimote Accessory Bus” — docs about the Nunchuck’s connector.
Getting One / How to Order
Available from the following wonderful shops:
– FunGizmos.com. International shipping for $1 more.
– Tinker.it (UK)
– Little Bird Electronics (Australia)
Update 20 Feb 2008: Over 200 wiichuck adapters sold to more than 50 people in 5 countries. I still have some available if anyone wants one. To those who ordered up to now, you’ll be getting them in the post in a few days.
Update 29 Feb 2008: Over 300 wiichuck adapters sold and I still have many more left. Get yours if you want one. :-) Anyone that’s ordered before today should receive their adapters via first class post soon. I’ll be unable to mail out any orders for the first week of March.
Update 24 Mar 2008: I still have several left. If you’re in AU, you can also get the adapter kit from Little Bird Electronics.
Update 11 Apr 2008: Updated the nunchuck_funcs.h library to easily work with a nunchuck plugged directly into an Arduino by adding a nunchuck_init_with_power() function (see comments below). Also, I still have several adapter kits for sale.
Update 6 May 2008: All Out! But I’ll be doing another board run in a few days and will update here when I have more available.
Update 8 Jun 2008: FunGizmos.com is now carrying Wiichuck adapters! They also have lots of other cool things, like BlinkMs. :-)
Update 7 Jan 2009: Both FunGizmos.com (US) and Tinker.It(UK) carry the Wiichuck adapter.
Update 31 Mar 2009: Fixed small bug that made it not compile under more recent Arduino, and fixed links. Also: if you’re having problems getting this to work, in the Arduino software, go to the “Boards” menu, switch to a different Arduino board type, compile, then switch back to your type. This forces a recompile of the Arduino I2C/TWI library that sometimes doesn’t get compiled correctly.
Update 18 Feb 2010: Updated API description to note that “nunchuck_init_with_power()” was removed in favor of “nunchuck_setpowerpins(); nunchuck_init();”.
Update 6 Dec 2011: Updated to work with Arduino 1.0 (still works with Arudino 0023 too). Changed download links to github repository.
Hello Tod – I’m trying to get a Nyko Kama Wireless nunchuck to work with your wiichuckdemo.
I have an arduino uno protoboard working fine with your code and a standard nintendo wired nunchuck. All works good with the original nunchuck from nintendo…but not with my Nyko Kama Wireless nunchuck.
I have verified that my Nyko Kama Wireless nunchuck works by plugging the receiver dongle into the wii remote and the light on the receiver instantly goes solid indicating that it has synced/paired with the wireless nunchuck. But when I plug the receiver dongle into my arduino running wiichuckdemo, nothing happens…the light on the receiver does not light up and I and not reading anything from the nunchuck.
I would expect that the dongle’s LED would light up and sync with the nunchuck as soon as it is powered up…or do you think that it must successfully be intialized on the I2C bus before the receiver lights up the LED and starts the sync process? If so, could there be an issue with the initialization procedure? Should I try a different device ID other than 0x52 on the BeginTransmission? Should I try writing a different sequence other than the 0x40,0x00 and 0x00,0x00 that your code uses? (I tried 0xF0, 0x55 and 0xFB, 0x00 as suggested by other posts but still nothing)
I know it has been many years since you worked on this project…hopefully you may still have a few hints to point me in the proper direction!
– Marco
hi i am using the adapter from little bird
when i load the sketch and go to serial as soon as the chum and wireless connector sync the serial just freezes?
any ideas or solutions i have tried few adapters now and all the same!
any help would be great
Hi Lars,
Those errors are to support the regular Arduino and using the Analog pins 2 & 3 for a ersatz power & ground. And it does it the old way.
As a temporary work-around, comment out lines 30 & 31 of nunchuck_funcs.h and make sure you hook the nunchuck’s power pins up to proper power & ground.
Hi guys,
[
Hi lars
The library should support the Due, since the library is using the standard Arduino Wire library. But the I2C SCL & SDA pins are in a different location than on a regular Arduino.]
Yes, I think that it should work too. But there is not just the problem that the adapter does not match the DUE. After compiling i’ve got this errors. his errors.
I don´t understand what i need to do….
can you help me?
I bought this and it works great, but to those using non-OEM nunchucks … I keep getting values like 255 255 1023 1023 1023 0 0 that is x,y analog and x,y,z axis and c and z respectively …
any clue to what seems to be the problem it has a JPN (japan) label on it … the KOR (korea) works fine..
Hi lars
The library should support the Due, since the library is using the standard Arduino Wire library. But the I2C SCL & SDA pins are in a different location than on a regular Arduino.
hi! I have already known for a while with the WiiChuck library and the Arduino UNO. For a larger project I need an Arduino DUE. Will the library eventually support this platform?
The wiichuck adapter is for the Wii nunchuck, not for the Wii remote. The Wii remote is never used here.
Many experts suggest that the IR Camera in the Wii remote
be physically broken out in applications where one needs
to get access to the IR coordinates on its Pixart camera.
Can this Wii adapter be used/modified to read the IR coordinates
from the I2C on the external/hardware interface on the Wii remote
without destroying the remote ?
Regards
Gerhard