
Did you know you can run Arduino programs on tiny BlinkM Smart LEDs? It might make BlinkM the smallest Arduino so far. To use a BlinkM as an Arduino, all you need is the free Arduino software, a low-cost AVR programmer, some wire, and a BlinkM.
Here’s a quick video showing how it all works.
BlinkM Capabilities as an Arduino
The BlinkM board doesn’t have nearly the I/O pins and other features of a real Arduino board. But it is very tiny. Here are its capabilities:
– 0.4″ square (MinM), or 0.6″ square (BlinkM)
– 8MHz clock speed
– 8k bytes Flash ROM (4kB on ATtiny45)
– 512 bytes RAM (256 bytes on ATtiny45)
– 512 bytes EEPROM (256 bytes on ATtiny45)
– 5 I/O lines total, partitioned as:
– 3 high-brightness LEDs in RGB package
– 2 digital I/O lines
– 1 analog I/O line (shared with digital)
And if you snip off the RGB LED, the three I/O lines used by it can be used as analog or digital inputs.
Most libraries will probably not work without some modifications. You don’t get a hardware serial port either, but SoftwareSerial works.
Software Setup
To enable the Arduino software to program BlinkMs, you’ll need to teach Arduino about new “Boards”. This is done via a set of config files and AVR core code. This work has been done by the High-Low Tech group at MIT and Alessandro Saporetti.
The BlinkMuino.zip zip file contains everything you need. This zip file works for Mac OS X, Windows, and Linux.
Unzip BlinkMuino.zip and copy the resulting “hardware” folder into your Arduino sketchbook folder. You can find the location of your sketchbook folder from the “Sketchbook location” field in the Arduino Preferences . On Mac OS X, this is usually “/Users/yourname/Documents/Arduino“. Once you copy the BlinkMuino “hardware” folder into your sketchbook, the resulting folder path should look like:
“/Users/yourname/Documents/Arduino/hardware/blinkm“.
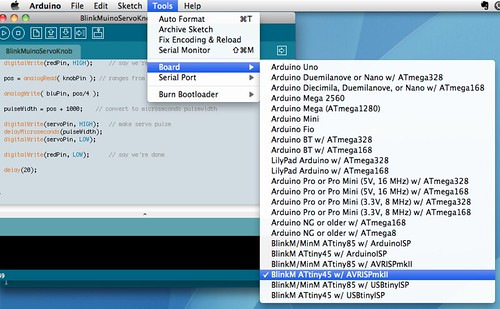
Restart the Arduino software and the “Tools” -> “Board” menu should now have entries for BlinkMs. There are three sets of entries, depending on the type of BlinkM and programmer you have. Select the entry that is correct for your hardware.
Hardware Setup
You will need an AVR-ISP programmer to program the BlinkM boards. If you have an Arduino board, the ArduinoISP sketch turns the Arduino into an AVR-ISP programmer. However, it doesn’t work for all Arduino boards. Or you can use a regular AVR-ISP programmer. These are fairly low-cost: the Atmel AVRISPmkII is 35 USD, while the Adafruit’s USBtinyISP is 22 USD.
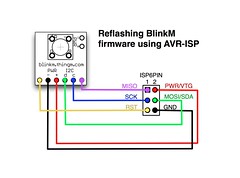
With a programmer acquired, wire up the BlinkM to it. If using a regular AVR-ISP programmer, it should be wired up like below. The intro video shows a practical method of using a breadboard and jumper wires to convert the 6-pin AVR-ISP connector to something a BlinkM can use. Note that some programmers do not supply power to the BlinkM, so you may need to run power too.
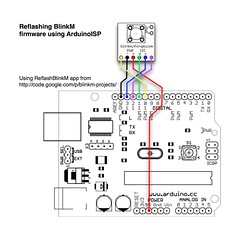
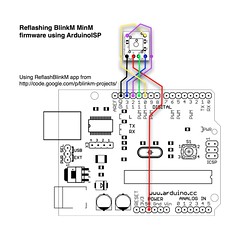
If using AruinoISP, the hookup is as below. See the diagrams and photos on the ReflashBlinkM page for details.
Using BlinkM as an Arduino
Now load up one of the example sketches located in the “hardware/blinkm/examples” folder of your Arduino sketchbook.
When you press the “Upload” button, the Arduino software will use send your program to the AVR-ISP programmer you’ve hooked up and it will program the BlinkM.
While the BlinkM is being programmed, its blue LED will flash. Once it stops flashing, the BlinkM starts running the Arduino sketch. At this point you can disconnect the BlinkM from the programmer and use it however you like. It runs stand-alone, no computer or Arduino board required, just power.
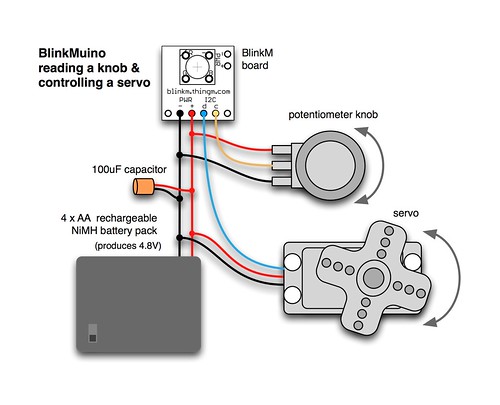
As an example, below is the “BlinkMuinoServoKnob.pde” sketch shown in the video. It assumes it is hooked up to a potentiometer knob and a hobby servo as in this diagram:
/*
 * BlinkMuinoServoKnob -- Control a servo with a knob
 * 2011 - Tod E. Kurt - https://todbot.com/blog/ - http://thingm.com/
 */

// BlinkM / BlinkM MinM pins
const int redPin = 3;  //
const int grnPin = 4;  //
const int bluPin = 1;  // PWM, will blink when programming
const int sdaPin = 0;  // PWM, 'd' pin, can be digital I/O
const int sclPin = 2;  // A/D, 'c' pin, can be digital I/O, or analog input

const int servoPin = sdaPin;
const int knobPin  = sclPin;

int pos;
int pulseWidth;

void setup() {
  pinMode(redPin, OUTPUT);
  pinMode(grnPin, OUTPUT);
  pinMode(bluPin, OUTPUT);

  pinMode(servoPin, OUTPUT);
  pinMode(knobPin, INPUT);

  digitalWrite(grnPin, HIGH);     // do a little "hello there" intro
  delay(100);
  digitalWrite(grnPin, LOW);
}

void loop() {
  digitalWrite(redPin, HIGH);     // say we're doing something
  pos = analogRead( knobPin ); // ranges from 0-1024
  analogWrite( bluPin, pos/4 );
  pulseWidth = pos + 1000;    // convert to microseconds pulsewidth

  digitalWrite(servoPin, HIGH);   // make servo pulse
  delayMicroseconds(pulseWidth);
  digitalWrite(servoPin, LOW);

  digitalWrite(redPin, LOW);      // say we're done
  delay(20);
}
Getting BlinkM back to Factory Firmware
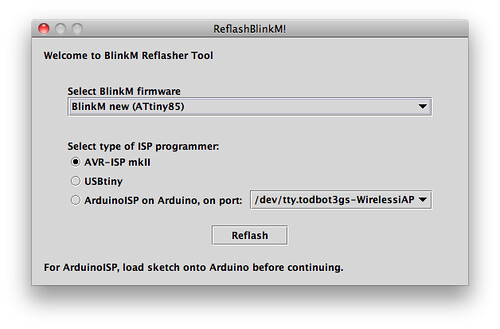
Programming a BlinkM board with Arduino sketches erases the normal BlinkM firmware. If you want that functionality back, there is a collection of BlinkM factory firmware files and an application to program them called ReflashBlinkM. Use this to get your BlinkM back to factory-fresh conditions.
Have Fun!
Using the BlinkM board as a general purpose microcontroller board is a real blast. It’s astounding being able to reprogram something so small with the easy-to-use Arduino software. If you develop something neat with a BlinkMuino, let me know in the comments.
Hi Kasper,
Yes it would be possible to add a button to a BlinkM, but there’s not enough pins so you would either a) be okay with losing one of the RGB colors, b) be okay with occasional spurious I2C traffic as you use an I2C pin as a button input, or c) use HVPP programming mode to re-use the RESET pin as an input.
I looking for a solution to combine a led with a button, controlled by a main Arduino for processing. I would like to use as less wires as possible.
Could it be possible to use the solution you provide with the RGB led and adding one button. I would like to receive the button data by i2c and send led colors with i2c.
Any thoughts on this are welcome. See also my topic on the Arduino forum:
http://forum.arduino.cc/index.php?topic=170567.0
Hey Todbot,
Is there any reason why loading a library such as servo.h won’t compile?
Thanks!
Great project Tod! Thanks for sharing!
I’m using a group of MaxM’s in series, and send commands via the main interface. Can the “input” pins on the MaxM be used as outputs to drive a couple of servos, or are they input only as the name implies?
What a cool bean project! Hey your diagrams/illustrations are beautiful.
What software did you use to do them in. Apple stuff I bet…
This is a great, fun project, can’t wait to do. Thanks!
oh thank you so much! Im pretty sure that was the problem!
again thank you so much for this awesome software!
It’s people like you that have inspired me to go to school for engineering and combine my passion for art and engineering to create amazing things!
Hi,
First thing to try is make sure you’re using the older Arduino 0023 and not the latest Arduino 1.0. Arduino 1.0 makes some changes to the underlying aspects of Arduino that I haven’t yet had a chance to test.
Im trying to do this with the Maxm but for some reason none of my sketches will compile. I keep on getting errors that say:
BlinkMuinoBlink3.cpp:10:21: error: Arduino.h: No such file or directory
BlinkMuinoBlink3.cpp: In function ‘void setup()’:
BlinkMuinoBlink3.pde:-1: error: ‘OUTPUT’ was not declared in this scope
BlinkMuinoBlink3.pde:-1: error: ‘pinMode’ was not declared in this scope
BlinkMuinoBlink3.cpp: In function ‘void loop()’:
BlinkMuinoBlink3.pde:-1: error: ‘HIGH’ was not declared in this scope
BlinkMuinoBlink3.pde:-1: error: ‘digitalWrite’ was not declared in this scope
BlinkMuinoBlink3.pde:-1: error: ‘delay’ was not declared in this scope
BlinkMuinoBlink3.pde:-1: error: ‘LOW’ was not declared in this scope
any help?!
nevermind i got it! thanks!
I cant seem to get the arduino IDE to add the binkm boards to the tools -> board menu. im doing exactly as you said, copying the hardware folder from the blinkmuino folder into the arduino folder and then changing the sketchbook location to the blinkm folder and restarting the arduino IDE. ive tried several times and its just not working. any ideas?
todbot,
You can’t imagine how happy I am since I found your ‘Blinkmuino’ project.
So many small projects I didn’t build because an ATMega was overkill.
Is there a way to have a list of the instructions / functions that
work on this mini ‘arduinized’ board.
J.
Hi AG,
If you turn your BlinkM board into an Arduino you lose the BlinkM functionality. So you’d have to recreate that functionality yourself. Depending on what you’re trying to do, this might not be that big of a deal. And it does mean is you could store your sequence in the flash ROM as part of your sketch code instead of using the rewrite-able EEPROM BlinkMs normally use (which is a much smaller amount of memory) You might even want to write a more memory-efficient way of storing sequence steps instead of the 5-byte format BlinkM uses.
Now if what you’re really after is light scripts/sequences that go for a really long time, you might want to check out the ‘W’ (Wait/long duration pause) command that’s in newer BlinkMs. This lets you create a pause for up to 227 days, in 5-second increments. Check out the BlinkM datasheet for details. http://thingm.com/fileadmin/thingm/downloads/BlinkM_datasheet.pdf
Could turning a BlinkM into an Arduino allow longer light scripts than the default 49 commands that the BlinkM provides? I ask because I’d love to program something much longer and keep it self contained. Thanks.
Thanks Tod, I am pleased you liked it, your nicely detailed post is what started it ;)
On the PWM issue, I was sure I had it going, but then it was late at night and who knows what I did, I could have been using your BlinkMuinoFade sketch without realizing it… sorry if I confused @craig.
BTW, now that I can program them easily like an Arduino my thinking gears are spinning fast and I started working on another idea on how to use my other BlinkM: I was thinking of turning it into a water indicator for plants; my main concern was battery consumption and after I started experimenting with a combination of solar cell charger and joule thief combination I realized that the BlinkM might be overkill for this one and it could be used for something more ‘worthy’. So, although I really like the size of the BlinkM, I might substitute it for a stock ATtiny with a standard LED, I will let you know if I decide to stick with the original plan.