DIY Ambient Orb with Arduino, update

There’s been some confusion as to whether or not the DIY RGB orb presented in the last post was actually connected to a computer and receving color data from it. Here’s a video that more accurately depicts what’s going on and all the code used to create it.

Hardware

The hardware is just an Arduino board connected via USB to a laptop. The Arduino appears as a serial device to the computer. On the Arduino board, three LEDs (red,green,blue) are mounted directly to the Arduino board using a prototyping shield like this DIY one. The schematic is quite simple:
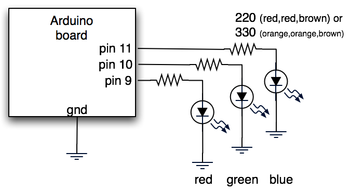
rgb_led_schematic.png

Arduino code

The code sketch running on the Arduino board is a slightly modified version of the one presented in the last Spooky Arduino class. Instead of parsing single color values over the serial port, it expects a full RGB color value in standard web format of “#RRGGBB” (white is “#ffffff”, blue is “#0000ff”, and so on). The sketch parses that seven character string into three bytes: one each for the brightness values of the red, green and blue LEDs.

Arduino code: serial_rgb_led_too.pde

Processing code

To bridge between the Arduino and the Net, a small Processing sketch was created that uses the standard Java HTTPURLConnection class to fetch a web page (really, a text file on a web server) containing a line with a color value in the format “#RRGGBB”. The sketch parses the color value, sends the value out to the Arduino orb using the Processing Serial library, and then sets its own background color to match. Because I’ve set the framerate of the sketch to 1 fps, it takes a second for the background to match the orb. I did this on purpose so I could get a sense of the color as the orb reproduces it before seeing it as it truly is. I was surprised how well the two tended to match!

Processing code: http_rgb_led.pde

Spooky Arduino Projects

spooky

Yesterday was the first of the four classes that comprise the Spooky Projects – Introduction to Microcontrollers with Arduino. Click that link to read the class notes and see some of the links mentioned.

The class seemed to go okay. We finished a little early. I had packed the first class a bit light fearing we’d be fighting USB serial driver issues, but the students in this class are all smart cookies and solved any issues they had themselves.

Logistically, the class was sponsored and held at Machine Project. They have a new large open area downstairs that is perfect for meetings or classes of around 15 people. It’s a great space and separated from the main gallery space meaning that classes and gallery showings don’t collide.

RoombaCtrl: Drive your Roomba with your cell phone

Ever since Bluetooth adapters for Roombas appeared, I’ve wanted to control my Roomba with a cell phone. All my recent phones have had Bluetooth. But getting a devkit for a phone was expensive and phone-specific. Trying to develop J2ME (aka “JavaME”) applications for cell phones has been a mess, especially for non-Windows users. Thankfully, Mobile Processing wraps up the ugly details, like Processing does for normal Java. It makes writing little programs for your phone pretty easy, and makes whipping up a program to control a Roomba possible.

So here’s “RoombaCtrl”, a small Java program for your Bluetooth- and J2ME-compatible phone that works with the build-your-own Bluetooth adapter shown in the book “Hacking Roomba” or the pre-built RooTooth.

RoombaCtrl Demo

Now you can drive your Roomba with your cellphone like so:

Continue reading “RoombaCtrl: Drive your Roomba with your cell phone”

Roombongle! A Roomba USB dongle

The RooStick by RoombaDevTools.com is pretty cool. It’s tiny and it’s USB, which is about all you need for me to bring you home.

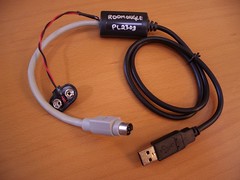
But if you want to hack together something similar and you don’t want to build a huge honking Roomba serial tether, you could build the Roombongle!

The Roombongle is a USB adapter that allows you to control your Roomba from your computer, via the Roomba’s SCI protocol. Don’t have a Roomba? Get one!


Continue reading “Roombongle! A Roomba USB dongle”

Arduino breadboard shield: $10 & 10 mins

Do you love Arduino?
Do you think the concept of Arduino shields is just the coolest?
Do you wish you could get some of those neat Arduino Prototyping Shields that Tom Igoe made?
Too bad no one sells them yet, because building your own versions of those boards is a bit out there for us ADD’ers.

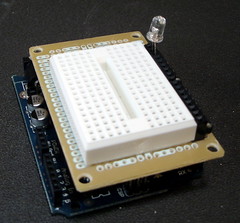
Don’t despair, there is a solution to the lack of breadboarduinos. You can build your own Arduino shield with a solderless breadboard in about 10 minutes and 10 bucks. It’s not nearly as full-featured as Tom’s prototyping shields, but it’s great way to quickly add a solderless breadboard to Arduino.

Continue reading “Arduino breadboard shield: $10 & 10 mins”