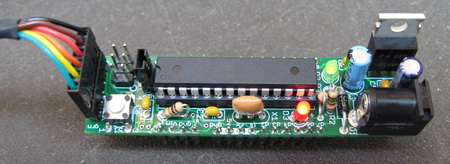
The Boarduino is an Arduino work-alike kit from Adafruit.com that’s smaller, cheaper, and you can build it yourself.
The Boarduino’s small footprint made me want to see how small of a device I could whip up in an hour from some fairly complex components. So I decided to see how small the combination of a Boarduino, a Wii Nunchuck, and a hobby servo motor could be. Here’s a little video of the result.
Hardware
The Wii Nunchuck is an amazing piece of technology. For $20 you get a 3-axis accelerometer, a 2-D analog joystick, two buttons, and it’s all accessed via the standard I2C protocol. A hobby servo is another piece great tech; only one wire is needed (besides power & ground) to specify the angle the motor should turn to. And both of these devices can plug straight into a Boarduino or Arduino board.
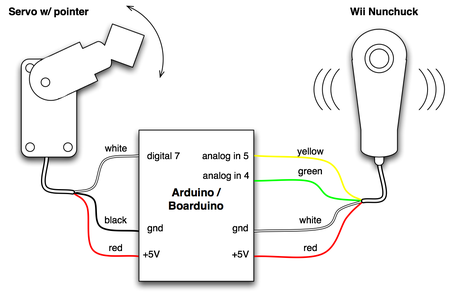
The schematic, such as it is, for the device in the video is:
Code
The code that the {Bo}arduino is programmed with is:
– wii_nunchuck_servo.pde
It borrows heavily from the great work done by Chad Philips at Windmeadow Labs.
About Boarduino
The Boarduino is small programmable microcontroller and is an Arduino work-alike. It uses the same programming software as Arduino and can substitute for an Arduino in any Arduino projects.
A Boarduino might be better for you if want a smaller and cheaper Arduino and don’t like running wires between your Arduino and a solderless breadboard. The Boarduino is made to be plugged into a solderless breadboard.
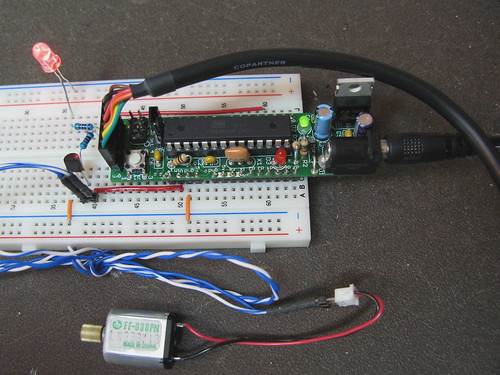
All its pins are at standard 0.1″ spacing.
This ends up being cheaper than the standard Arduino prototyping solution of a “shield” board that plugs onto the top of an Arduino board, especially if you do lots of projects. The Boarduino does cover up a substantial part of a breadboard. If this bothers you, there is the Bare Bones Arduino clone from Modern Device.
One of the ways Boarduino is so tiny is that it omits the USB-to-serial interface chip that is part of every Arduino board. Having that always present is really convenient, but it takes up space. The company that makes that chip, makes a cable that with the chip embedded into it.
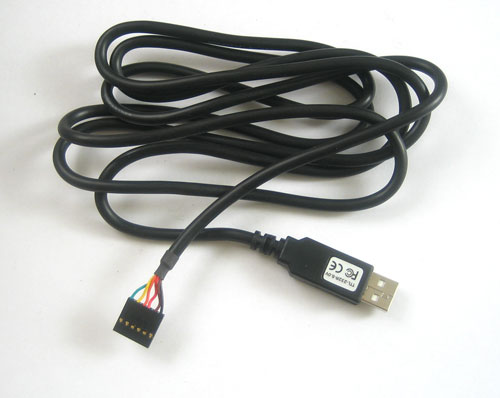
Adafruit sells this cable, cheaper than anywhere else if you buy it with a kit. If you have multiple Boarduinos, you only need one FTDI cable for them all. And the cables are useful for other little non-Arduino projects that require a USB-to-serial connection.
The Boarduino comes as an easy-to-solder kit, with excellent step-by-step instructions. In fact, the instructions are so good, with schematics and board layout files, you could build your own Boarduino without buying a kit from Adafruit, but they’ve done all the hard work so you just have to solder it together.
This is what the Boarduino kit looks like out of the bag:
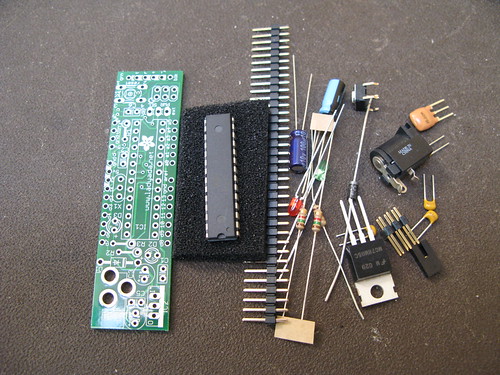
If this is off-putting to you, don’t worry. These are really standard parts that are hard to mess up. Adafruit’s documentation not only walks you through what the parts are and how to turn the kit into a working board, but also what tools you’ll need (with links) to get the job done. If you’ve soldered anything before, this will take you about an hour. If you’ve never soldered before, set aside a few hours. At the end you’ll have both an extra useful skill and a new working gizmo.
Finally, if you begin to grow out of the Arduino coding environment, the Boarduino is also a nice little inexpensive AVR ATmega{8,168) development platform. It contains the standard 6-pin ISP header that works with any AVR programmer.
If you like Arduino or AVR stuff, pick up a Boarduino and play with it. Then you too can make Frankensteinian devices like this:


Alright, will do. Thanks for the help.
Noise on the lines can cause stuff like that. The “Wire” implementation of I2C in Arduino is too simple to do check to see if a device is really there or not.
It sounds like it’s time to try this out on another Arduino or to try a different Nunchuck. This is one of the problems with debugging hardware: if it doesn’t work right off the bat, you need duplicates of stuff to exhaust all the possibilities.
It might be you have an ATmega chip with fried analog in pins 4 & 5. Or maybe the solder connections to them on the Boarduino board are intermittent/bad. Having a pre-soldered & tested Arduino can help here.
I’m sorry to take up so much of your time and comment space, but I just found out that the Arduino is reporting the following:
joy:46,46 acc:49,47,46 but:0,1
…when the green and yellow wires are *disconnected*. I’m absolutely confounded, and I’m hoping it means something you understand that I don’t.
Ok, well I took the voltage down to 4.7 volts, and I don’t get any output, even when swapping yellow and green wires. Do you think it’s a lost cause?
The black wire is supposedly some sort of “device detect” signal to the wiimote, I don’t think it’s necessary. The white wire is gnd, and the red wire is Vcc (which should be 3.3VDC for the nunchuck, but all the nunchucks I’ve had work fine at 5VDC)
Yes, I’m powering the nunchuck through the board’s 5v and gnd pins.
This is interesting, I swapped the green and yellow wires as you suggested, and I got the *exact* same result.
I took it out of the case, and saw no fried components. I did, however, see a fifth black wire, which I had cut off with the other fibrous matter inside the wire. Should I try connecting this anywhere?
Hmm. Well, the not-printing thing isn’t that surprising. The Arduino “Wire” library will just freeze in certain situations of incorrect wiring.
As an experiment, try swapping the two I2C wires that go to Analog input 4 & 5 (that is, put the one you have hooked to Analog in 4 to 5 and vice-versa). It won’t cause any harm and might just work. :)
How are you powering the Nunchuck? From the Boarduino 5V supply?
Thanks for the reply. I’ve checked my wiring, and I used a mulitmeter on the short detector or whatever it’s called to make sure that my terminals were wired to the proper arduino pins. I tried everything else in various combinations, except that I don’t have a Wiimote. I think I’ll probably rip it open and make sure nothing’s fried, and maybe test the connections. What I don’t understand is that when the nunchuck isn’t getting power, the program doesn’t print at all, so it must be actually sending false data.
Hi Peter,
A Boarduino is the same as an Arduino for this situation.
Some things to try:
1. Double and triple check your wiring to the Nunchuck. Before I made the “wiichuck adapter” I would always wire it up wrong.
2. Does the Nunchuck work with the Wiimote? It may be the Nunchuck got fried at some point and doesn’t work anywhere.
3. Rebuild the “Wire” library. To do this, in the Arduino application, switch the “Board” type from Diecimila to LilyPad and back again, then re-upload your sketch. Some people have experienced their Wire library getting compiled wrong.
4. Don’t have anything else hooked up to the Boarduino besides USB & the Nunchuck. The Boarduino doesn’t have as much power supply filtering as an Arduino board and other devices can cause issues.
5. Try the WiiChuckClass library instead of my code above. Lots of people are using it and have been having luck. It’s a bit better structured than the code I have up top.
And let me know how things turn out.
Hi, this guide is awesome, but I’m having the same issue as JRolSmith, I always get this:
joy x: 46
joy y: 46
accel x: 187
accel y: 185
accel z: 184
z button: 0
c button: 1
Nothing I do to the nunchuck changes it’s output. I’ve checked the connections with my multimeter, but have found no problems. I’m using a bare bones boarduino, but that shouldn’t change anything, right?
I’d appreciate anything you can tell me. Cheers.
Hi Chris,
The 164 address is likely because some I2C vendors treat the addresses as being shifted up by one bit (because of the read/write bit). This makes all addresses appear to be multiplied by two, so the Nunchuck address of 82 (0x52 in hex) looks like 164.
Just send 164 as the address and continue as you were going to. You should pretty easily be able to replicate the functionality of “nunchuck_init()”, “send_zero()”, and “nunchuk_decode_byte()” functions of the Arduino sketch linked above.
If after all that it still doesn’t work, try adding 4.7k-10k pullup resistors to the I2C SDA & SCL lines. The Microrobotics I2C app note has a “‘Long Distance’ I2C Bus” example showing this. You probably won’t need them because most microcontrollers include internal pullups that work for short cable runs, but adding them won’t hurt.
Hello all….
This is such a cool idea and I want to create my own but I’m having a bit of a problem. I’m not using a Arduino, I’m using a VM1 from http://www.microrobotics.co.uk
All was going well and the VM1 tells me that there is a device at address 164 but when I try to communicate with it, I just get 255’s in response. As the VM1 can see the nunchuck, I must have the wiring correct and the addressing wrong me thinks but am not sure what to do next. Because of the addressing differences I’m initializing with the address 164 then sending a 128 then a 0 after then another 0 to start the 6 byte receive. Have I got the 8-bit hex addressing to decimal correct or do you think I’m barking up the wrong tree. Loving your work Todbot.
Hi Georges, Do you mean ‘pins’ instead of ‘points’? You cannot change those pins and sill use the Arduino “Wire.h” library, because analog pins 4 & 5 are also the I2C pins SDA & SCL. This is part of the hardware of the ATmega chip on Arduino.
Hi All,
I recently succeded to reproduce some code using Arduino 010 and Wii Nunchuck. Please tell me where are the definitions concerning the number of plots to connect the Wii Nunchuck (analog 4 and 5). If I want to change these definitions and use more entries, which is the procedure.
Hi Dennis,
It looks like you’re using Arduino 0011 (which is good, it’s the latest). But Arduino 0011 changed a little bit how “#include” statements are processed. To get it to work, comment out the lines
from the sketch.
plz help me when i try to compile wii_nunchuck_servo.pde i get ALOT of errors:
/Users/dborup/Downloads/arduino-0011/hardware/tools/avr/bin/../lib/gcc/avr/4.0.2/../../../../avr/include/stdio.h:266: error: expected unqualified-id before ‘int’
/Users/dborup/Downloads/arduino-0011/hardware/tools/avr/bin/../lib/gcc/avr/4.0.2/../../../../avr/include/stdio.h:266: error: expected `)’ before ‘int’
/Users/dborup/Downloads/arduino-0011/hardware/tools/avr/bin/../lib/gcc/avr/4.0.2/../../../../avr/include/stdio.h:266: error: expected `)’ before ‘int’
/Users/dborup/Downloads/arduino-0011/hardware/tools/avr/bin/../lib/gcc/avr/4.0.2/../../../../avr/include/stdio.h:267: error: expected unqualified-id before ‘int’
/Users/dborup/Downloads/arduino-0011/hardware/tools/avr/bin/../lib/gcc/avr/4.0.2/../../../../avr/include/stdio.h:267: error: expected `)’ before ‘int’
/Users/dborup/Downloads/arduino-0011/hardware/tools/avr/bin/../lib/gcc/avr/4.0.2/../../../../avr/include/stdio.h:267: error: expected `)’ before ‘int’
/Users/dborup/Downloads/arduino-0011/hardware/tools/avr/bin/../lib/gcc/avr/4.0.2/../../../../avr/include/stdio.h:420: error: ‘__put’ was not declared in this scope
/Users/dborup/Downloads/arduino-0011/hardware/tools/avr/bin/../lib/gcc/avr/4.0.2/../../../../avr/include/stdio.h:420: error: expected primary-expression before ‘char’
/Users/dborup/Downloads/arduino-0011/hardware/tools/avr/bin/../lib/gcc/avr/4.0.2/../../../../avr/include/stdio.h:420: error: expected primary-expression before ‘struct’
/Users/dborup/Downloads/arduino-0011/hardware/tools/avr/bin/../lib/gcc/avr/4.0.2/../../../../avr/include/stdio.h:420: error: ‘__get’ was not declared in this scope
/Users/dborup/Downloads/arduino-0011/hardware/tools/avr/bin/../lib/gcc/avr/4.0.2/../../../../avr/include/stdio.h:420: error: expected primary-expression before ‘struct’
/Users/dborup/Downloads/arduino-0011/hardware/tools/avr/bin/../lib/gcc/avr/4.0.2/../../../../avr/include/stdio.h:420: error: initializer expression list treated as compound expression
Couldn’t determine program size: hardware/tools/avr/bin/avr-size: ‘/tmp/build51757.tmp/wii_nunchuck_servo.hex’: No such file
Hi Neodudeman,
Some adblock lists for Firefox block blip.tv for some reason. Which is dumb in my opinion, because blip.tv is the most open-source like video site I know of. Oh well. Thanks for uploading to Youtube. If an adblock is not the problem, then I don’t know what’s going on. Youtube’s player is a Flash video (.flv) playing object just like Blip’s player.