I finally figured out automated builds… for Arduino!

Currently I’m the main maintainer of node-hid, the Node.js package that lets you talk to USB HID devices like blink(1).  I recently cribbed automated build config from node-serialport so now node-hid is automatically built for Mac, Linux, & Windows and Node 4.x,6.x,7.x.   It’s pretty cool to have these robots doing my bidding.  But did you know you can do automated builds of Arduino sketches too?  I didn’t until last night and it’s AMAZING.

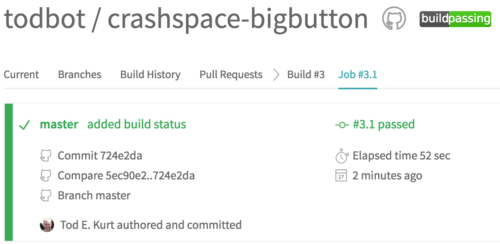
For instance, that CrashSpace BigButton Arduino sketch I mentioned previously, is now getting automatically recompiled for the Wemos D1 mini ESP8266 board every time I check in. See?

How is this magic done?

Continue reading “I finally figured out automated builds… for Arduino!”

CrashSpace BigButton w/ ESP8266

At CrashSpace we have a publicly-viewable “sign” at https://crashspacela.com/sign/ to let members know when the space is open. This sign page is updated by a big button in the front room. Press it, the sign page updates, and you’ve promised to be in the space for an hour.

But last month, the button broke. So I made a new one based on an ESP8266 WiFi module, WS2812/Neopixel LEDs, and a custom PCB fabbed on an Othermill. Schematics, PCB & firmware at: github/todbot/crashspace-bigbutton.

See below for:

  • construction details
  • PCB techniques for Othermill
  • “sacrificial Neopixels” for 3v3 to 5V level conversion


Some history

The first version of the BigButton I did back in 2010 consisted of an Arduino in a taplight tethered to a netbook running a Perl script. Last year it was upgraded by a member to a Spark.io SparkButton (early version of the Particle Photon Internet Button kit but not using the better chip of the Photon) with a custom 3d-printed case. That upgrade resulted in a much simpler and smaller Button than my original. It was great. But occasionally it would drop its connection and need a reboot. Then a month or so ago it just stopped working entirely. I ended up recreating the functionality with a Photon but found the environment limiting, particularly the near-requirement of an online compiler.

The New BigButton

For the new BigButton I went with the Wemos D1 Mini ESP8266 WiFi board. This is essentially a tiny version of the standard NodeMCU board that contains a USB-to-serial interface and the necessary support circuitry to control and reprogram the ESP8266 module. It’s easy-to-use, stable, and great. Instead of programming it directly, I figured I’d try the ESP8266 Arduino core and write an Arduino sketch.

The sketch uses the wonderful ArduinoJson library. It’s pretty memory efficient and uses clever C++ operator-overloading to let you write JSON parsing code like this:

// jsonstr = '{"is_open":false,"minutes_left":-920.45,"button_presses":[]}'
JsonObject& root = jsonBuffer.parseObject(jsonstr);
bool is_open = root["is_open"];
double minutes_left = root["minutes_left"];

Custom PCB Carrier Board

The first BigButton used flexible LED strip hot glued into a repurposed tap light. That worked but I wanted an excuse to do another Othermill-based PCB, so I created a carrier board that had 12 WS2812 LEDs and a socket for the D1 Mini board. There are breakouts for testing the WS2812s and the button inputs. It also has footprints for buttons and mounting holes for either standoffs or guide rails.

Otherwise the schematic is pretty straightforward.

Sacrificial Neopixels: Converting ESP8266 output for WS2812  LEDs

One interesting thing about the schematic how the ESP8266 (a 3v3 device) manages to control 5V WS2812/Neopixel LEDs. Some WS2812s can be driven by 3v3 logic HIGH, but it’s iffy. The standard solution is a level-shifter buffer to convert 3v3 HIGH to 5V HIGH.

The technique used on the BigButton board, however, is to create a “sacrificial” LED powered not by 5V directly but via a stepped-down voltage from a standard signal diode (with its 0.7V voltage drop). This creates an approximately 4.3V power source that is high enough to drive the LED but brings its concept of logic HIGH (>70% of Vcc) down to what a 3v3 device will output. Basically, we’re building a fakey intermediary power supply for a single LED. The rest of the WS2812 LEDs are driven by 5V.

Here’s a diagram perhaps making the idea more clear:


Othermill design considerations

I wanted the PCB to be millable on an Othermill, so that meant modifying my standard PCB design techniques. There are a few reasons for this. For instance, since this board has no soldermask, I want to maximize spacing between copper traces to avoid solder bridges. Also, I want to minimize the use of endmills smaller than 1/32″ because they are fragile and take a long time to mill.

Thus, the techniques I use are:

  • Increase trace width 16 mil (0.016″)
  • Add ground plane, set its Polygon->Isolate value to 32 mil (0.032″)
  • Single-sided only design (or minimize back-side traces)
  • Space components out to enable easy soldering

The result is below. The Wemos D1 Mini board is mounted on the backside of the board so it doesn’t affect light output.

For the enclosure I reused the original 2010 BigButton taplight enclosure because its diffuser is really pretty good.  Plus my Fusion360 skills weren’t up to making a custom 3D printed enclosure.
The PCB is mounted on standoffs that are then screwed into the modified taplight. The taplight’s switch is reused as the button input.


The final result is flashed with WiFi credentials, wired for power, and installed on the wall.

CrashSpace BigButton w/ ESP8266, WS2812/Neopixel, using Othermill


pb-n-fun: donk

Blast from the past! I found an mp3 of work I did back in 2006 or 2007. This has guitar-like sounds in it, but I think it’s really from a Yamaha ES7. It feels a little Cure-like to me at times. But it’s simple. I like it.

todbot – donk.mp3

blink(1) and C.H.I.P. work great together!

Thanks to NextThingCo‘s recent efforts with getting Debian on their nifty little C.H.I.P. board, I was able to quickly get working my blink1-tool for our blink(1) USB LED. Let the blinky disco commence!

Mostly as a reminder to myself, here’s what I did.  (based on the “Flashing with Debian” section of this document)

On the vagrant ubuntu VM, update the CHIP tools and flash the CHIP board (be sure to have the FEL-to-GND jumper in place when flashing, and remove it after):

$ sudo apt-get update
$ sudo apt-get install u-boot-tools android-tools-fastboot git build-essential libusb-1.0-0-dev
$ rm -rf ~/sunxi-tools/
$ git clone http://github.com/NextThingCo/sunxi-tools
$ make
$ sudo rm -rf /usr/local/bin/fel
$ sudo ln -s $PWD/fel /usr/local/bin/fel
$ cd ~/CHIP-tools/
$ git pull
$ ./chip-firmware-update.sh -d
$ cu -l /dev/ttyACM0 -s 115200

Once the flashing is done, remove the FEL jumper and power cycle the board.  When it comes up, connect to it via ‘cu’ (the last command above), get it on the net, get the compiler tools, then download and compile blink1-tool.  No changes to blink1-tool Makefile needed. Easy!

# nmcli device wifi connect todbot ifname wlan0
# apt-get install build-essential pkg-config git 
# apt-get usbutils libusb-1.0-0-dev

# git clone https://github.com/todbot/blink1
# cd blink1/commandline/
# make

# ./blink1-tool --list
# ./blink1-tool --random=1000 -m 10 -t 20 -l 2

Cross-compiling C programs for C.H.I.P. Linux

blink1-chip-almost

My blink1-tool command-line program is very cross-platform. It currently supports Mac OS X 10.6.8-10.10.6, Windows XP-10, FreeBSD 10+,  most Linux distros including Ubuntu, RedHat, OpenWrt, Raspberry Pi, BeagleBone, and Linino Arduino Yun.  And I want it to work for C.H.I.P.

The NextThingCo C.H.I.P. runs a tiny Linux similar to OpenWrt or Arduino Yun.  For these systems, you don’t compile on the device itself but instead “cross-compile”: run a compiler on a computer that generates binaries for the target system.  If you’ve ever played with Arduino, you’re invoking the avr-gcc cross-compiler for the AVR chip on the Arduino board.

Setting up cross-compile with “buildroot” setups

In these small Linuxes, you use a system of Makefiles and cross-compiler suite called buildroot to build your kernel, select kernel features, and choose libraries and programs to build into your disk image. With C.H.I.P., NextThingCo has made things easy by creating  a pre-setup CHIP-buildroot and good instructions on how to get a tailored VM to run it.

Generally to compile your own program, you want to create a package for use by buildroot.  I find this a bit weighty, so I just create a section of my existing Makefile for new systems like CHIP.

The two things you need to know when doing it this way:

  • Path of cross-compiler (CC) and linker  (LD)
  • Path of any cross-compiled libraries your program needs (CFLAGS & LIBS)

Once I get the cross-compile system built with the libraries I need, I set up a Makefile sort of like this:

CCBASEDIR=/home/vagrant/CHIP-buildroot/output/host
TARGET_DIR=$(CCBASEDIR)/usr/arm-buildroot-linux-gnueabihf/sysroot

CC = $(CCBASEDIR)/usr/bin/arm-linux-gnueabihf-gcc
LD = $(CCBASEDIR)/usr/bin/arm-linux-gnueabihf-ld

CFLAGS += -I$(TARGET_DIR)/usr/include/libusb-1.0
LIBS += -L$(TARGET_DIR)/usr/lib -lusb-1.0

The above is showing what I discovered for CHIP-buildroot running inside the vagrant VM they’ve defined.  For a simple hello world program that talks libusb, the above’s all you need.  Here’s some additional discussion on simple cross-compiling for CHIP.

CHIP buildroot configuration

Unfortunately, CHIP’s firmware is currently highly pared down, so to get libusb I went to the buildroot config and added “libusb” as a package to build.

% cd CHIP-SDK
% vagrant up && vagrant ssh 
$ cd CHIP-buildroot 
$ make chip_defconfig 
$ make menuconfig

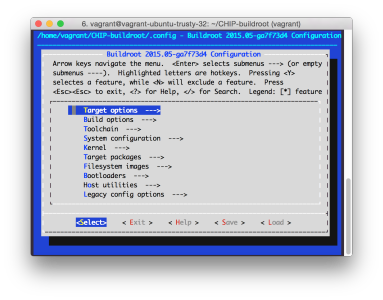
In menuconfig (pictured below), make the changes:

  • Build options -> libraries (both static and shared) -> both static & shared
  • Target packages -> Libraries -> Hardware handling -> libusb
$ make toolchain
$ make libusb  
$ make    # optional,builds new firmware & selected packages, ~60 mins

Screen Shot 2015-10-10 at 4.03.29p

The results, sigh, *this close!*

At this point I could hack up the blink1-tool Makefile and start compiling. And… It worked! It compiled! I excitedly ‘scp’d the resulting binary to my CHIP, and blink1-tool --help and… It printed!

But when I tried scanning for USB devices, it came up empty. I’ve had this problem before where a Linux libusb-based program compiles and runs but libusb can’t see any devices. Generally recompiling with the “right” libusb solves the problem, but I’m not sure what that means here.

Time to go back to a simple libusb “hello world” with maximum error checking turned on and see what’s what.

Alpha C.H.I.P. first setup impressions

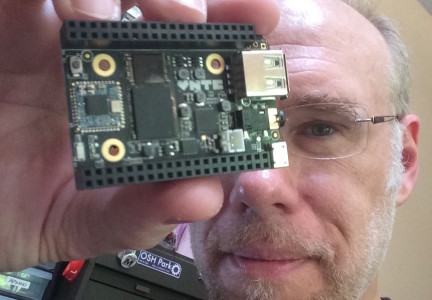
IMG_6130

I recently received part of my Kickstarter reward from the famous C.H.I.P. $9 computer project.  This is the “Alpha C.H.I.P.” board that is hardware complete, but has no firmware.  So you need to install the SDK and flash the firmware yourself.  If you’re a kernel hacker (like me, I’ve been poking on Linux internals since ’98 and OpenWrt since ’06), this is pretty great. It gives one a chance to see the build process for an interesting tiny Linux system.

The steps to get C.H.I.P. up and on WiFi and accessible via ssh were very straightforward, very non-frustrating, and spelled out in the following links:

Each of those stages is pretty straight forward.  In short, these are the steps in each stage (where ‘%’ means my Mac, ‘$’ means the vagrant linux VM, and ‘#’ means CHIP command lines):

1. Install CHIP SDK

  • Install Virtual Box & Oracle Extension Pack
  • Install vagrant
  • % vagrant up && vagrant ssh
  • $ ./CHIP-SDK/setup_ubuntu1404.sh

2. Flash CHIP from CHIP SDK

  • Put jumper wire between FEL & GND pins on CHIP
  • Plug CHIP into computer’s USB
  • % cd CHIP-SDK
  • % vagrant up && vagrant ssh
  • $ cd CHIP-tools && ./chip-update-firmware.sh
  • $ cu -l /dev/ttyACM0 -s 115200
  • # hwtest
  • # exit
  • % vagrant halt

3. Get CHIP on WiFi

  • % sudo cu -l /dev/usbmodem14141 -s 115200
  • # connmanctl enable wifi
  • # connmanctl scan wifi
  • # connmanctl connect wifi_….

Here’s a complete log of everything I did, showing output for those interested: http://pastebin.com/w5pDhHAe

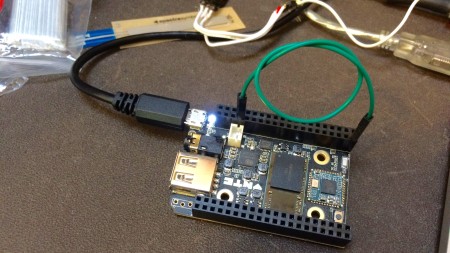
And here’s a pic of the FEL to GND connection needed to reflash the firmware:

IMG_6133


Note: you should have some familiarity with “vagrant” and Linux command lines if things go wrong.  If you do have a problem, just try deleting VirtualBox, vagrant, and the CHIP-SDK checkout and starting from scratch.  (I had an old VirtualBox and vagrant install that caused some issues initially)