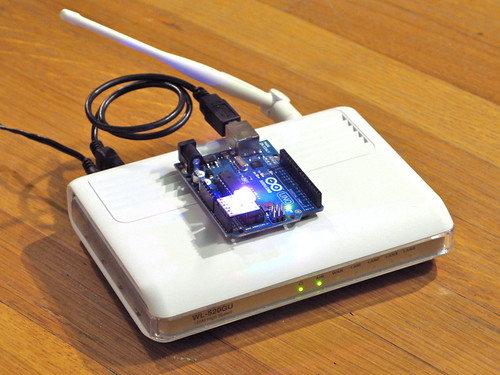
I love Arduino but its lack of wireless bugs me. And it sucks that WiFi Shields for the Arduino cost as much a cell phone. I want something cheap. Turns out, small, cheap WiFi routers like the Asus WL-520gu can run the DD-WRT Linux firmware and act as serial-to-network gateway for Arduinos (or most any other USB device). Here’s how to do it.
(Hey, is this a Wifi-controlled BlinkM? I think it is.)

A quick video showing a router acting as a serial-to-network gateway:
This is not that new of a concept, hacking Linux onto a router for some neat DIY purpose. One of my favorite past hacks is MightyOhm’s WiFi Radio project. And of course, see my own book Hacking Roomba for an example of how to put a Roomba on the Net.
This post is specifically about trying to make a DD-WRT router a transparent gateway for an Arduino.
The steps are:
- Install DD-WRT Firmware
- Configure Router to be WiFi Client
- Do Some Tests
- Install USB Serial Drivers
- Install Serial-to-Network Proxy
1. Install DD-WRT Firmware
To get it working, you need to install two firmware files. The first is to convert from standard Asus firmware to a standard DD-WRT, then the second adds in additional features.
Follow the steps in the “New Wiki Install Material” section on DD-WRT’s wiki on the Asus WL-520gu. It seems scary at first, but stick with it. (And for more than you ever wanted to know about Asus and TFTP, see Asus_TFTP_Flash.)
Below is an abbreviated and summarized version of the full instructions.
1a. Download firmwards and needed tools
Download the “trx” firmware to your computer. (“trx” files are what Asus routers need when updating via TFTP) It is called: dd-wrt.v24-12548_NEWD_mini_asus.trx.
Also, download the second “bin” firmware to your computer. (“bin” firmware files are what DD-WRT uses. It is called: dd-wrt.v24_usb_generic.bin
1b. Install 1st firmware (“.trx”)
Connect your router to your computer via an Ethernet cable, set your computer to have the IP address 192.168.1.7.
Do the mentioned “30-30-30” reset to the router, then send the “trx” firmware file with tftp. On Mac OS X (and Linux), do this by opening up a terminal window and typing:
% tftp 192.168.1.1

tftp> mode binary

tftp> put dd-wrt.v24-12548_NEWD_mini_asus.trx

tftp> quit
Then wait for five minutes (seriously). Power cycle the router and its web interface should be available. It will ask you for a admin username and password, be sure to fill this out.
1c. Install 2nd firmware (“.bin”)
This is a pretty standard firmware upgrade process. Just follow the instructions in the DD-WRT page above and you should end up with a router that’s ready to go.
2. Configure Router to be WiFi Client
With the router running a good basic DD-WRT firmware, it now needs to be modified to act like a wireless client, instead of an access point, enable things like SSH server for command-line access, and enable USB.
After each step below, reboot the router.
2a. Enable wireless client mode
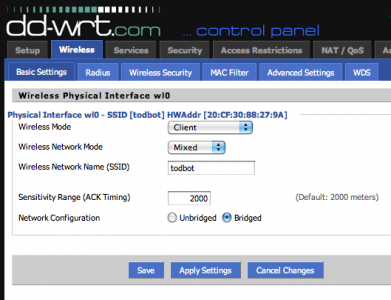
Go to the “Wireless/Basic Settings page, and set the router to be a wireless client on your network. If you have WEP/WPA, you’ll need to go to the Wireless/Wireless Security page to set that up. And if you want your Arduino to have a static IP address instead of a DHCP-obtained one, head over to Setup/Basic Setupand change “Connection Type” to “Static IP”; you’ll be presented with a set of form fields to input the IP address.
Note that at the end of this, your router will have two IP addresses: one being the “management” IP address of 192.168.1.1 you’re currently using to configure the router and only available via a “LAN” Ethernet port, and the other being the DHCP or static-assigned IP address on your network. The router considers this the WAN IP address. (even though this router is not going to be acting like a router in the normal sense)
DD-WRT “Wireless/Basic Settings page

2b. Enable useful management options
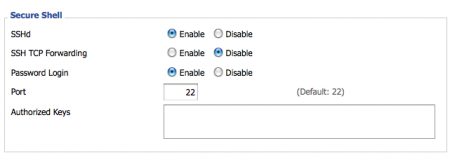
In the Services/Services page, in the “Secure Shell” section, enable SSH so you can log into it and copy files to it.
In the Administration/Management page, in the “Remote Access” section, enable Web and SSH access from the WAN port (and the IP address the router gets from your WiFi), and in the “JFFS2 Support” tab enable JFFS2 so you have some flash memory you can write to.
DD-WRT Administration/Management page

Go to the Security/Firewall page, and turn off the firewall. This doesn’t need to be a super secure thing (at least not to start). And it causes lots of problems that are hard to diagnose.
2c. Enable USB
Go to the Services/USB page and enable the USB kernel drivers. The firmware doesn’t come with USB-to-serial drivers needed for Arduino, we’ll do those later.
3. Do Some Tests
At this point, on reboot your router should join your WiFi network, grab an IP address from your network’s DHCP server, and have two IP addresses. The first, is the “LAN” admin IP address of 192.168.1.1. This only works when you have an Ethernet cable plugged into one of the LAN ports. The other address is the “WAN” address that’s obtained over WIFi from your network.
3a. Find the WAN IP of your Router
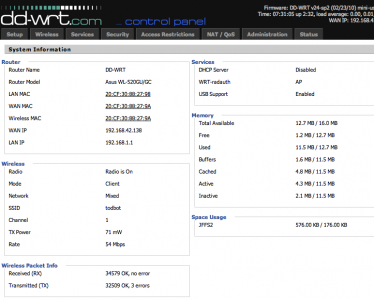
Because of the various settings above, the admin page and ssh server is available on both IPs. If you go to the Status/Sys-Info page (using the admin IP address and an Ethernet cable), you can see what the WAN IP address is, like below. On my network, the Asus got an IP of 192.168.42.138.
3b. Test out SSH login
You should also log into the router now. The username is “root”, not the admin username you chose when first setting up the router. The password however is the password you chose during first setup. Open up a terminal window and ssh in.

DD-WRT is a real Linux, but with a reduced command set. Many useful commands are there though, like “ping”, “wget”, “lsmod”, “df”, etc.
4. Install USB Serial Drivers
Now that you have a working system, time to put on the USB serial drivers. There isn’t a very good way of doing this on such a memory-constrained router like the WL-520gu (the routers with more built-in flash can properly use the “ipkg” package management system to get these drivers). But here’s one way:
4a. Find USB Serial Drivers
This USB kernel modules post on the dd-wrt.com forums has a zip file called “fs_and_usb_modules_2_4_37.tar.gz ” containing the three files we need to talk to an Arduino. You can download that driver bundle yourself and pull out the files needed.
Or you can grab them from here:
– fs_and_usb_modules_2_4_37/usb/serial/usbserial.o
– fs_and_usb_modules_2_4_37/usb/serial/ftdi_sio.o
– fs_and_usb_modules_2_4_37/usb/acm.o
The last one is what you use if you’re using an Arduino Uno. The other two are what you’re using for any other kind of Arduino.
4b. Put Drivers in Router’s flash space
The “JFFS2” feature lets us use part of the flash memory as a disk. We’ll put the drivers there. So ssh into the router, cd over to the jffs partition and pull down the drivers.
% ssh root@192.168.1.1

# cd /jffs

# mkdir kmods

# cd kmods

# wget http://todbot.com/asus_wl520gu/fs_and_usb_modules_

2_4_37/usb/serial/usbserial.o

# wget http://todbot.com/asus_wl520gu/fs_and_usb_modules_

2_4_37/usb/serial/ftdi_sio.o

# wget http://todbot.com/asus_wl520gu/fs_and_usb_modules_

2_4_37/usb/acm.o
4c. Load drivers and set to startup automatically
Back in the DD-WRT web interface, go to the Adminstration/Commands page and copy the below into the Commands window:
insmod /jffs/kmods/usbserial.o

insmod /jffs/kmods/ftdi_sio.o

insmod /jffs/kmods/acm.o
Click “Run Commands” to run the commands immediately. Click “Save Startup” to make these commands run on reboot. You could have also typed those commands on the command-line.
On the ssh command-line, you can type “lsmod” to see if the drivers have loaded.
If you have an Arduino or FTDI cable plugged into the USB port on reboot, you can also type “dmesg” to see if the Arduino is detected. In dmesg you should see:
usb.c: registered new driver serial

usbserial.c: USB Serial support registered for Generic

usbserial.c: USB Serial Driver core v1.4

usbserial.c: USB Serial support registered for FTDI SIO

usbserial.c: USB Serial support registered for FTDI 8U232AM Compatible

usbserial.c: USB Serial support registered for FTDI FT232BM Compatible

usbserial.c: FTDI FT232BM Compatible converter detected

usbserial.c: FTDI FT232BM Compatible converter now attached to ttyUSB0 (or usb/tts/0 for devfs)
5. Install Serial-to-Network Proxy
Now that you have the Arduino showing up as a serial device to the router, you can use any unix tool that can talk to serial devices to control the Arduino. Or you could write your own. While this router probably doesn’t have enough memory for PHP or Perl, you could write a compiled program in C/C++. You’ll need to install the cross-compile tools, which isn’t exactly trivial unfortunately. You can find some tips at the DD-WRT Wiki on Development, this post and this post on the dd-wrt.com forums, and this OpenWrt wiki page on the SDK.
But perhaps one of the most useful is a “serial proxy”. This is a familiar concept in the Arduino world. A serial proxy is a small program that essentially turns a serial port into a TCP port. There is a good small command-line one called “ser2net” that comes with Ubuntu.
I didn’t want to get the full WRT SDK cross-compiling up and running to port ser2net to DD-WRT and thankfully I didn’t have to. Andrew Hazelden has done the hard work and posted the results in a post about how to use serial ports on the Linksys WRT54GS (a very similar router).
You can read his post for more details and more code. I’ve stuck the single file needed for us here:
– ser2net_2.3-1_mipsel.ipk
5a. Download and Install ser2net
SSH into the router again and do the following:
% ssh root@192.168.1.1

# cd /jffs

# wget http://todbot.com/asus_wl520gu/ser2net_2.3-1_mipsel.ipk

# ipkg install ser2net_2.3-1_mipsel.ipk

# rm ser2net_2.3-1_mipsel.ipk
This will install ser2net in /jffs/usr/sbin/ser2net .
5b. Test ser2net
Time to do some tests. Get your Arduino, load up a sketch on it that reads and writes to the serial port (I like bitlash, a command interpreter for Arduino), and plug the Arduino into the router.
Then on the command-line, type:
# ser2net -C "3001:raw:600:/dev/usb/tts/0:57600 NONE 1STOPBIT 8DATABITS -XONXOFF -LOCAL -RTSCTS"
This runs ser2net with the settings of:
– “3001” is the TCP port you will connect to,
– “/dev/usb/tts/0” is serial port (will be “/dev/usb/acm/0” for Arduino Uno),
– “57600” is the baud rate
On another computer, open up a network terminal program like the command-line “telnet”:
% telnet 192.168.1.1 3001
You should be able to communicate with your Arduino as if you were using the Arduino Serial Monitor.
5c. Put ser2net in startup script
Once you figure out the ser2net config that works for your setup, you can have that run on startup by editing the startup command. Go back into the DD-WRT web gui and go to Administration/Commands. Edit the Startup script and add your ser2net command line to it. When you click “Save Startup” the result will be something like this:
DD-WRT Administration/Commands page

Done!
Now you can unplug your Arduino, load up any sketch to it, and then control it from where ever you can ping that router. You can even have the Arduino pull data out from the Net by having a different kind of serial-to-network proxy that is Arduino-facing, instead of Net-facing.


Hmm, I am stuck again. When I execute “ipkg install ser2net_2.3-1_mipsel.ipk” I get:
ERROR: File not found: /jffs/usr/lib/ipkg/lists/whiterussian
You probably want to run `ipkg update’
ERROR: File not found: /jffs/usr/lib/ipkg/lists/non-free
You probably want to run `ipkg update’
ERROR: File not found: /jffs/usr/lib/ipkg/lists/backports
You probably want to run `ipkg update’
ipkg_install_file: ERROR unpacking control.tar.gz from ser2net_2.3-1_mipsel.ipk
If I run “ipkg update” then try “ipkg install ser2net_2.3-1_mipsel.ipk” again, I get:
ipkg_install_file: ERROR unpacking control.tar.gz from ser2net_2.3-1_mipsel.ipk
Without any error messages to know why extracting control.tar.gz fails, I can only guess it is space related. I have tried a trick using RAM as the temp space (http://www.dd-wrt.com/phpBB2/viewtopic.php?t=50318&view=previous&sid=90e5c39fabacb03f6d7b0b5116319cde):
1) make a directory in /tmp,
mkdir /tmp/tmpIpkg
2) link the above directory to /jffs/tmp
cd /jffs
ls -s /tmp/tmpIpkg tmp
3) make the ipkg directory
mkdir tmp/ipkg
And even went so far as to do the same for /jffs/usr (which is where the ipkg lists were) but it didn’t seem to help. I am still researching, but if there are any pointers as to what I am missing, I would be grateful.
I also had the need to select the “Clean JFFS2” option under the “JFFS2 Support” and then “Apply” (DO NOT “SAVE”) before I had any available space.
Hi Dan,
I’ve used the YellowJacket many times. It’s great, a very nice small low-power device. I used it for our TweetM kit. However the YellowJacket has a few issues. Most notably it’s rarely in stock. Other problems are needing to hard-code the SSID, gateway, IP address, and other networking parameters. Also, it doesn’t support DHCP or DNS, meaning you need to do everything with static IP addresses. And it only connects with certain access points. Many, but not all.
Before installing the USB drivers into jffs in step 4B, I had to check the box for “Clean JFFS2” under JFFS2 Support, then reboot. It showed approximately 2400KB for Total\Free before doing that.
that sure is a lot of trouble, and much more expensive than this $ 55 “YellowJacket” arduino that has WiFi built-in:
http://asynclabs.com/store?page=shop.product_details&flypage=flypage.tpl&product_id=24&category_id=11
Cheers,
Dan
Comment on Step 3.
I couldn’t get a DHCP address from my main AP until I went to Status\Wireless; scrolled down to the bottom of the page and pressed “Site Survey” button; on the following page showing available AP’s in my area, clicked on “Join” button. Also seemed like I had to “Join” even with a Static IP address.
Before doing that I was seeing “WAN IP 0.0.0.0” from the Status\SysInfo page.
Hope this helps someone else.
I would still go for a cheap ENC28J60 shield ($20) and a router/ap/repeater like ASUS RT-N12($40). The router makes it possible for me to connect to multiple Arduino based webservers (sensors & relays) in my garden.
Do you know if it is possible with a Arduino UNO to use a USB WIFI adapter?
You can use a WRT54, but since it doesn’t have a USB port, you’d have to use the internal serial port.
Could you do the same to a WRT54 router from linksys. I know people have reflashed the firmware for that model. I just happen to have 1 so I would really like to play around with this.
I’ve been advocating using ‘plastic appliance linux boxes’ as front-ends to arduinos for a while, now. I did toy around with the ethernet arduino shield but got bored real fast with it and its limitations. the lack of any security was also a show-stopper for me.
linux systems has ip-tables (and many other security front-ends) that you can take advantage of for free. the ‘plastic firewalls’ are cheap enough and fanless and make perfect front-ends for controller apps.
another box I’m hacking these days is the seagate dockstar. has 3 usb ports, gig-e and a usable amount of cpu and ram to run stock debian from a stick (lol). no need for ’embedded’ treatment, you can run full native gcc-enriched linux and enjoy apt-get and all that groovy stuff if you are ok with being usb-thumb drive boot based. not a problem for most of us, I don’t think.
if you have usb, you have serial (of course) via the usb/serial converters. the arduino-blessed one is the FTDI $20 version but you can also use PL2303 chips and standard linux has built in drivers for that, too. and so once you have serial, you can talk to controllers.
Sky, yes, I think you can install Python (or Perl or PHP or many other Linux packages available via the apt-like “ipkg” package manager) onto a USB thumb drive. Look at Optware, the Right Way and USB Storage for some clues. (There’s no clear recipe however)
Seth, you can totally have the Arduino be a data logger that you poll over the Net. Just build your Arduino app so that you can do what you want via the Arduino Serial Monitor. Then unplug the Arduino from your computer, plug it into the Asus router and connect to it via telnet (or a data downloading program) to download the data.
Scott, you can totally use this technique on routers without USB ports, since they (almost universally) have an internal serial port you can get at if you don’t mind soldering a couple of wires to some pads on the router board. In the case of the WL-520gu, check out MightyOhm’s great description of how to add a serial port cable to an WL-520gu.
Great post, Tod!
Following mightyohm’s tutorial and some tips from the Buck Up Chinny blog, I fitted an arduino to the added serial port header of a WL-520GU (running OpenWRT) and use it to display the local wunderground weather on a VFD. The glue for my solution is a python script running on the router, parsing the weather info and passing it to the arduino to display.
Looks like, in your screen shots, one of the dd-wrt options is USB Storage Support. Is there a way to run python from a USB flash drive attached to the router under dd-wrt?
This is awesome!
With this setup, would you be able to data log w/ the arduino (arduino + memory card) at a remote location then log into the arduino via the router and get the data off the memory card?
Thanks!
After the holiday, I ‘was’ going to write up a similar solution for my first blog post: use a wireless router as an access point, but together with an Arduino wired-Ethernet shield. I am glad I did not do that because – while both ideas are way cheaper than an Arduino wireless solution – your idea of using USBUSB as a serial port saves the $50 cost of a wired ethernet shield.
Very creative, and well done! These routers are cheap new or used, and I’d been itching for an excuse to upgrade my old WRT54GS 802.11g router to something newer so I can get 802.11n on my LAN.
Would you know offhand if the router’s internal hardware serial port would work just as well for the serial proxy?
With the hardware serial port, you could in theory hook up sensors directly (sans Arduino), or maybe serially connect old computers which lacked USB (for example, old 8-bit home computers from the 80’s).