I’ve been frustrated with my calendars not being in sync between my iPhone and my Mac’s iCal. I’ve inadvertently double-booked myself many times. I didn’t want to spend $99 a year for MobileMe because I already spent a lot on remote servers and don’t need most of what MobileMe offers. I just want calendar syncing. The below has been described by many others, in much greater detail and clarity. This is really a list of things I did so I can remember it.
The essential idea is both iCal and the iPhone Calendar program can talk to a CalDAV server, much like Mail.app and iPhone Mail can talk to an IMAP server. Google Calendar is a CalDAV server, so let’s use that, since it’s free and already set up. If you already have a CalDAV server, you can use that instead as the intermediary.
1. Create calendars in Google Calendar
Sign into Google Calendar and set up however many calendars you want. Once you do that, go to the bottom of the settings details for a particular calendar you’re interested in and note its “calendar address”:
2. Set up iCal to sync with Google Calendar
In Preferences in iCal, go to Accounts, click the “+” to add an account, and choose “Google” as the account type. Fill in your info.
Click on the “Delegation” tab for the newly created account, and pick which other calendars you want besides your main one (if any). You’ll see them in a separate list in the calendar list pane.
Now you have calendars that sync between iCal and Google Calendar.
3. Set up iPhone to sync with Google Calendar
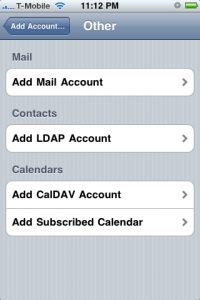
On the iPhone Settings app, go to the “Mail, Contacts, Calendars” section and scroll down to “Add An Account…”. Choose “Add CalDAV Account” and fill in your Google Calendar login info.
If you just have the one main calendar on Google Calendar, that was the last step, you’re done and any changes you make on the iPhone will get send to your Google Calendar, which iCal will then pick up. And vice-versa. If you want to add one of the secondary calendars, you have one more step.
4. Adding a “delegate” Google calendar to iPhone
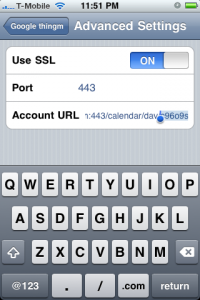
To add secondary Google calendars (what iCal calls “Delegates”), you need to do step (3) again. Then with this second CalDAV account on the iPhone, go into its “Advanced Settings” section of that account’s information and edit the Account URL. Replace the “username@gmail.com” part of the URL with the Calendar address you noted down from step (1).
That is, the full CalDAV URL for my main Google calendar is:
https://www.google.com/calendar/dav/tod.kurrt@gmail.com/user
and the full CalDAV URL for my “things-to-do” calendar is:
https://www.google.com/calendar/dav/c96o9s8ne6fb070cle0frp8e58@group.calendar.google.com/user
You’ll probably find it easier if you email yourself this URL from your computer, pull it up on your phone, and use copy-n-paste to enter it.


I think the point being that delegates aren’t handled at all, which is what’s causing the problem. Delegates won’t even show up on iCloud. This is one major productivity failure or oversight in my opinion.
Hi Stan,
I think for additional Google calendars, you need to not create additional accounts but use the “delegate” function mentioned above.
Any chance you can give me a hand with this? I’ve an iPhone 4S but got an identical problem on my mac (running 10.6.8). I can only create ONE single instance of a CalDAV account with my email address.
Creating another tells me “Cannot Create Account, An identical CalDAV account already exists.” There is no Advanced Settings tab at this stage. If I try going into the existing account and into Advanced Settings, I can’t change the Account URL.
Creating a new CalDAV account but using a cheat username with a + symbol to fool the server (i.e. stan+home@gmail.com) it tells me “Cannot Connect Using SSL, Do you want to try setting up the account without SSL?”. I click Continue and the next message is “Calendar Account, Unable to verify account information”. I click OK and the the Advanced Settings tab appears so I select it, switch Use SSL from OFF to ON, whereupon the port changes from 80 to 443 and the Account URL gains an s from http://… to https//… . But I’m still unable to paste in and replace the Account URL.
Any help appreciated. I’m not a whizz on these matters so all help is very welcome!
Thanks in advance.
I had the same problem so went down the above route. The only issue with this is you can’t attached files to the calendar appointments (eg if you need to take a particular document to a meeting). Any thoughts on how you get around this.