
[2014-May-9: updated to work with Arduino 1.0 and moved into github]
One of the challenges of working with I2C (aka “two-wire” or “TWI” or “Wire”) devices is knowing the I2C address of the device. Older devices have a fixed address, or a “choose one-of-four” approach. But newer I2C devices have fully programmable addresses, leading to cases of not knowing what address a device is at.
Fortunately, there’s a technique one can use to “scan” an I2C bus and determine these addresses. Conceptually it’s very similar to a network “ping”. Below is an Arduino sketch “I2CScanner.pde” that turns an Arduino into an I2C bus scanner.
– I2CScanner.ino — Turn Arduino into I2C bus scanner (github repo)
When loaded up on an Arduino, the sketch will immediately scan the I2C network, showing which addresses are responding.

For example, the above output is from an I2C bus with four slave devices on it (one BlinkM MaxM, three regular BlinkMs).
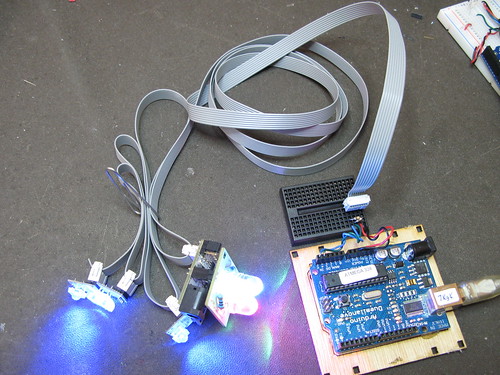
(Notice the 2 pull-up resistors on SDA & SCL. This is needed for longer bus lengths)
One thing to notice about the I2CScanner output is that although there are four devices on the bus, only three addresses were detected. This is because unlike IP networks and “ping”, you can’t tell if two devices have the same address. They’ll both respond to commands sent to them just fine, you just can’t read back data from them.
How it works
In I2C, the first byte transmitted/written by the master to a slave is the address of the slave. If there is a slave at that address, the slave will signal the I2C bus, otherwise it leaves it alone. We can use this to implement a bus scanner.
The Arduino “Wire” library utilizes a set of C functions called “twi.c”. One of those functions is “twi_writeTo()”. This function is used to both send the address of the slave down the bus and also to write data to slaves. It returns 0 if it was able to successfully transmit a byte or non-zero if it couldn’t. Since the very first write to a slave is its address, a very simple bus scanner using it would be:
void scanI2CBus(byte from_addr, byte to_addr) {
  byte data = 0; // not used, just a ptr to feed to twi_writeTo()
  for( byte addr = from_addr; addr < = to_addr; addr++ ) {
    byte rc = twi_writeTo(addr, &data, 0, 1, 0);
    if( rc == 0 ) {
      Serial.printl("device found at address ");
      Serial.println(addr,DEC);
    }
  }
}
In the I2CScanner sketch, this function is extended a bit to support a callback function. The callback function is called with the result of every address scan. In I2CScanner, this callback function is called “scanFunc()” and just prints out “found!” or nothing, but it could be modified to do more complex tasks like doing additional I2C transactions to figure out what kind of device it is, or setting all the devices to a known state, etc.
Thanks for this Tod. What a great tool!
Any thought on including a i2c.receive() feature with your i2cMaster library? It seems it can only send data. It would also be nice to eventually include other Wire.h-like functions, such as i2c.available() and i2c.requestFrom().
I was considering using your library for my I2C real-time clock in order to free up 2 analogue pins, but alas there isn’t an i2c.receive() feature.
Hey Dan or anyone else that has a suggestion,
I know you posted it a long time ago, But did you ever resolve your issue? I’m having the exact same problem on my Arduino Mega 2560. I don’t have any i2c device connected, I get the same result even if a device is connected. Once twi_write() executes, it crashes and resets. It never makes it past the first address it polls. It just continues to loop after the twi_write function starting at the beginning of the setup function and never makes it out to the loop function.
I have tried other sketches and the same thing happens. With a different sample sketch, it crashes/resets after the wire.endtransmission() function. I can’t get a return code from it.
Any help to point me in the right direction in troubleshooting this is greatly appreciated. I’m not sure what else to check or overlooked.
Thanks!
I’ve seen some self-addressed I2C devices have an address of less than 8 and I chose an upper bound of 100 just so the print out looked even. A hack, yes. :)
Why do you scan from the addresses 1 to 100? The only valid device addresses for I2C are addresses 8 through 119. (0b0001000 to 0b1110111)
http://www.i2c-bus.org/addressing/
Same problem for me… need help for this. If i plug TWI wires off it will print all 1…100 buss adress.
This sketch is not working for me at all….I am trying to get a knockoff nunchuck (intec) to work with my duemilanova…and am having trouble, so I want to “ping” the address to make sure it is the same as the nintendo nunchuck….
The sketch just hangs after
I2CScanner ready!
starting scanning of I2C bus from 1 to 100…
I plugged in some printlns and inside the following….the before prints, but the after does not.
  for( byte addr = from_addr; addr <= to_addr; addr++ ) {

Serial.print("before");

    rc = twi_writeTo(addr, &data, 0, 1);

Serial.println("after");

    callback( addr, rc );

  }
Thanks Rob. What sensors are you using? I’m interested in all things I2C.
Awesome little sketch, just what i needed to get my sensors going!!
Hi,
I am trying to use your sketch to confirm the address of a modified Electronic speed control unit. I can control these units ( I have 3 of them) but I would like to be able to confirm addresses of units which have an unknown address. My problem is that I cannot get your sketch to detect the units. Using the known, working units which have addresses of &h52,54 &56 respectively, the sketch runs and no known units are found. I have tried with and without pull up resistors. Any suggestions? I’m afraid my understanding of I2C and Arduino is limited so any pointers would be appreciated.
Thanks
David
Hi Stephan,
The normal value one sees for pull-up resistors on an I2C bus is 4.7k. But if you’re running many devices or a long bus cable, you should lower that to 2.2k or even 1.0k.
Hi,
You noticed the two resistors on the SDA and SCL line, but what are the values?
Stephen
I had to change the end address to 127 to have my DS1307 show up in the scanner. If your device isn’t showing up, you might try increasing the end address accordingly.
that’s awesome! thanks for sharing this..
Hi Andre,
The cable is made from standard 0.05″ pitch ribbon cable and standard 0.1″ pitch IDC crimp connectors. The cables used in your PC for IDE disk drives are the same (but with more connectors). In this post, I list the exact parts I used:
http://todbot.com/blog/2008/06/17/get-on-the-blinkm-bus-with-a-blinkm-cylon/
Is that multidrop cable custom made ? Whats are the details.