
![]()
The notes for the fourth and final class are up on the Spooky Arduino class page. At the end of the class, Mark of Machine Project bestowed upon each of the students a merit badge. It was great. Click above for a larger view of the badge.
Arduino MIDI Drum Kit and Spooky Sound Trigger
Here’s a quick project using techniques from this week’s class that turns an Arduino board and a few buttons and piezos into a MIDI drum kit or scary sound trigger. Hide piezo sensors around the house during your Halloween party to trigger scary sounds when people walk around!
Hardware
The hardware is an Arduino board with a MIDI jack, a few buttons, and two piezos attached to it. It runs off of a 9V battery.
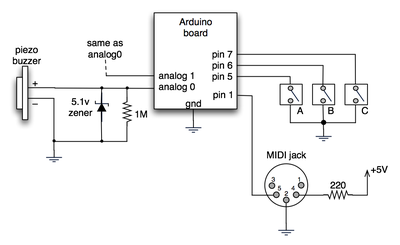
(Note: depending on what kind of MIDI connector you’re usign (jack or cut-off cable), you may need to swap the connections to MIDI pins 4 & 5).
For the piezo input, the 1M resistor is to bleed off the voltage generated by the piezo when it is struck. The 5.1v zener diode is there to insure any large voltages don’t make it into the Arduino and blow it out.
Arduino code
The code has a few tricks that may not be immediately obvious. First is that to implement a MIDI interface, all you really need is the ability to send serial data at 31,250 bps. This is easily done with “Serial.begin(31250)“. Once that is done, a complete three-byte MIDI note-on message can be sent with three “Serial.print(val,BYTE)” commands.
The next tricky bit is that the switches in the above schematic don’t need pull-up resistors. This is because the internal pull-ups in Arduino’s AVR chip are turned on with a “digitalWrite(pin,HIGH)“. This may seem counter-intuitive, doing a digitalWrite() on an input pin, but it’s how the AVR works. The benefit is that you no longer need a resistor to +5V and the effort to wire up each additional button is much lower.
The final trick is measuring impact force on a piezo. When piezo elements are struck, their output voltage rings, sort of like a bell. Kind of like this:
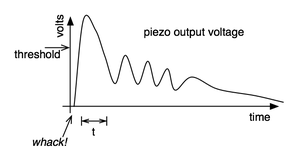
By measuring the time it takes for that first big jolt to cross a threshold, you can get an idea as how big the force was. In the code this is represented by reading the analog value and if it’s over the threshold, wait until it drops down again, counting all the while. When I’ve done this before, I used an input opamp to convert the analog signal to digital (thus doing thresholding in the analog domain) and then used interrupts to get very accurate force measurements.
Arduino code: midi_drum_kit
Thanks again for the info, Tod. Here are the links:
The NES joystick library for Arduino
An NES joystick MIDI controller
Another MIDI controller made from a kid’s toy
Fun stuff. Thanks again!
Rob
Hi Rob,
About the MIDI jack and pins 4 & 5: it depends on whether or not you’re talking about a MIDI cable or a MIDI jack. I was following what other Arduino users have done as discussed here and here and I think perhaps we may’ve all be using a cut off MIDI cable instead of a proper MIDI jack.
As for noteOn() and noteOff(), yeah it’s a hack, and a hold-over from when I first started doing MIDI programming back in the ’90s. Some MIDI devices didn’t respond correctly to the “note off” command but did to “note on with zero velocity”. It makes for confusing code and I should change it (or at least document it).
Good luck, and when you do a blog post about your creation, please link to it here in the comments, or post something about it in the Arduino forums. Others can learn from the additions/advances you make.
Sorry, you can ignore that last comment – I should’ve kept reading down below where it says that a noteon with a velocity of 0 is the same as a noteoff. I’ll stop now. Sorry again, but I’m on a roll right now. Thanks for the insipiration.
hi tod,
i noticed that your noteOn() and noteOff() are the same. on this page, it looks like your (0x80 | (channel
thanks a lot for this page, tod. i think i found one error in your schematic. pins 4 & 5 on the midi connector seem to be swapped. in making this simpler version of what you’ve got as a test of my Nintendo game pad library, i noticed that everything seemed to be working but my midi-usb interface wasn’t getting the messages. i found another pinout with those pins swapped and it worked correctly after that. thanks again and good luck.
Hi Tyler,
The two common ways of quickly and reliably reading analog inputs on microcontrollers is 1) have a periodic timer interrupt that reads the input, or 2) have an interrupt that is triggered when the analog-to-digital converter completes its conversion. When an interrupt fires, it runs a bit of code that’s separate from your normal main loop. Recent versions of Arduino provide easy access to some types of interrupts, but I’ve not played with them much yet. Also, the Arduino IDE doesn’t stop you from using normal AVR C code to do your own interrupts (though you do have to be knowledgeable about how the Arduino code sets up the AVR chip on the Arduino board)
Hey Tod, thanks so much for this tutorial. I was wondering though: you say in the PDF “there are much faster ways of watching inputs than loops with analogRead().” What are those faster ways? Can it be done on the Arduino?
Hey,
I was wondering if this board would support enough triggers to make a midi xylophone. (probably around 60) If not what would be an alternate solution?
Hi,
The converter program I mentioned above doesn’t care about the baud rate (which you’re right, MIDI is at 31250 bps and most Arduino sketches are at 9600), because it’s just receiving data from one part of the computer’s OS and sending it to another. The baud rate difference would only be a problem if you’re trying to send a lot of MIDI (or very accurately-timed MIDI) over your 9600 baud link.
Hi and congratulation,
You were speaking about sending midi through the USB flow… and thank you for the link toward the MAC convertor ;)
But i m wondering if there is not a problem of bandrate …. it s not 9600 in midi message, but is the convertor will understand it ?
(heh. I get email when someone makes a comment)
I didn’t quantify the lack of accuracy, except to note that it was far rougher than a similar system I built in ’90. :)
I’m sure if you played around with the code you could make it more accurate. Poke around on the Arduino site & forums to see if anyone else is working on trigger-to-MIDI code. Chances are someone is and they probably have a more elegant solution than my quick hack.
Dang, fast reply! So 6 is nice. Um, just how inaccurate is it?
Hi frog,
The Arduino has 6 analog input pins, so you can have 6 piezo pads. The Arduino also has 14 digital input/output pins (one of which must be used for MIDI out), so you can have at most 13 buttons.
I consider it a toy because I whipped it up in an afternoon. Also, the piezo velocity-sensitivity measurement as implemented isn’t very accurate. To get it more accurate would require some input buffers added to the hardware and better access to interrupts.
But yes, you can pretty easily make a portable battery powered 19-input trigger-to-MIDI out of an Arduino and it would work reliably and be a lot of fun.
Can you Todbot or anybody here tell me how many sensors or piezos this project will take? I see five in the video. Can it take 8 without serious modifications? And Todbot, why do you think this is just a toy? A simple velocity sensitive, battery powered trigger-to-midi converter is a great tool! I was thinking about trying this.
hi there..
i juz wanna request for a diagram…
can u interface piezo sensor with plastation controller? i try it once for drummania game but it doesnt react that fast… maybe you can help built it from scratch… i am a noob in electronics…
sorry for my bad english
goodluck to you
thanks
jbc,
For Mac OS X, I built a Roomba-to-MIDI driver that appeared as a virtual MIDI interface to standard MIDI software on the Mac. Coding-wise, talking to a Roomba and talking to an Arduino is very similar. I had planned on slightly reworking the code for Arduino but never got around to it.
cool – what software on the Mac did you use?
Hi jbc,
In short, probably not.
The Arduino’s USB interface appears as a virtual serial port to your PC, not a MIDI interface. This means that most music software won’t see the Arduino as a MIDI device. I think there are some programs like Max/MSP that can treat a serial port as a MIDI device but it’s not a standard practice. There might also be a serial-to-MIDI converter program you could run on your PC to create a fake MIDI interface. I’ve done this on the Mac but I’ve no idea how to do it on Windows. If you find such a program, let me know!
How easy is it to send MIDI out from Arduino to a PC through the standard USB interface? Would Windows-based MIDI software see the Arduino as a MIDI interface if it’s sending MIDI formatted messages over serial?
Hi Melvin,
Any professional product like the Vdrums will be vastly superior. This is mostly a toy. It’s an afternoon project to play with. I’ve not seen the edrums diy so I don’t know if it’s as much of a toy as the Arduino project above, of it it’s actually designed to be a real MIDI drum brain.