Do you love Arduino?
Do you think the concept of Arduino shields is just the coolest?
Do you wish you could get some of those neat Arduino Prototyping Shields that Tom Igoe made?
Too bad no one sells them yet, because building your own versions of those boards is a bit out there for us ADD’ers.
Don’t despair, there is a solution to the lack of breadboarduinos. You can build your own Arduino shield with a solderless breadboard in about 10 minutes and 10 bucks. It’s not nearly as full-featured as Tom’s prototyping shields, but it’s great way to quickly add a solderless breadboard to Arduino.
Parts you’ll need:
– small solderless breadboard, Digikey 923273-ND
– small circuit board, Radio Shack 276-150
– Two 8-pin header sockets, Jameco 70755 or Digikey AE10048-ND
– Two 8-pin single inline wire-wrap sockets, Jameco 78642 or Digikey S7006-ND
(all part numbers are suggestions, use what you know. for instance, some of the part suggestions are actually 16-pin parts you snip in two 8-pin chunks)
Steps:
0. Get the circuit board in your hot little hands
1. Take the wire-wrap sockets and insert them into the furthest row of holes on the circuit board. Solder them down.
2. Insert the header sockets right next to the sockets. Solder them down.
3. Take the double-stick tape off the solderless breadboard and stick it on the circuit board next to the sockets.
4. Gently bend one row of wire-wrap pins a bit closer to the other set of wire-wrap pins. This is because the space between the two sockets on the Arduino board aren’t on a 0.1″ grid like the circuit board. Too bad for us.
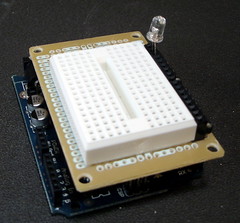
5. You’re done! The final product looks like this:
Notice that since the circuit board has a line of two rows of pads connected together no wiring is required, just some quick soldering:
You may want to add a dab of hot glue to the opposite corner from where the sockets are to act as a bumper and keep the board level.
Use:
Because this shield is only one-sided, it can be used either in an “open” configuration, like so:
Or you can use it “closed” like a normal shield, as in the picture up top. In this configuration, the analog and power jacks are still easily accessible, but the reset button and ICSP header are a bit hard to get to. Ah well, it was only 10 minutes of work.
The normal shield configuration makes for a nice compact chunk of reconfigurable computation to add to other devices, like, oh I dunno, how about:
Add a 9V battery with a little velcro and you got yourself a nice little portable development platform:
(yes, I like Radio Shack, what’s it to ya?)


My package of shell scripts for use with Arduino and SimpleMessageSystem is now available 24/7 via:
‘wget http://user.cavenet.com/rolandl/SMS1.tgz‘
and I have added a GUI script for controlling the IO pins 2-13. It uses
Xdialog, & includes instructions for getting that program if needed.
Dang, the part numbers were stale, after two attempts one of the part numbers backed me two headers again and then when I find the termial strip leaders aren’t long enough :( bummer too bad my radio shack doesnt have those terminal strips…
Next version of arduino, please please use 0.1″ spacing…it will make life so much easier… Thanks :-)
I have succeeded in my project to use the above hardware from the shell.
Run this now: ‘wget http://207.14.167.161/SMS1.tgz'tgz‘
It only works when my system is booted, so keep trying.Finally got the right data format from readAD-1: Comma-separated values. This imports to OpenOffice calc easily, for further analysis or graphing. Try it.
I have the Diecimila w/USB, and arduino-0010
under Kubuntu. The software is incredibly ugly and hard to use. I was able to get the blinking LED program loaded. My plan now is to
modify the Simple Messaging System for USB and talk to the unit via a shell script. Has anyone done this yet? Thanks.
-rolandl@cavenet.com
Hi Mykle,
Thanks for letting me know about the part number staleness. I’ve updated the page to have updated part numbers for both Jameco and Digikey.
Hi,
Since the Arduino Proto-Shiled boards seem to be unavailable, and i’ve got a deadline, I’m really glad to find this alternative.
However, those Jameco part numbers don’t seem to exist in the Jameco on-line store any more. I’ll try my semi-local electronics parts store …
… and if I were smart, I would have posted the URL.
http://www.tigoe.net/pcomp/code/archives/arduino/000760.shtml
Totally cool. I am gonna link this to the phys comp site at school so students can make ’em on the cheap. Thanks!
btw, the gerber files for my boards are online if anyone wants to make their own, and Batchpcb.com prints the board for cheap.
What’s a Arduino?