Magic wands do exist, as gyro mice

ThingM‘s own Mike Kuniavsky was featured on BoingBoing today. Woot!

Mike spent some time getting a Gyration Air Mouse to work on Mac OS X as a gestural input device. The Gyration stuff is interesting because it’s based upon a two-axis gyroscope. It’s not accelerometer-based like some of the old game console controllers (or like the Sudden Motion Sensor in the new Mac laptops)

I got a few of those mice as well to experiment with, thinking it would be a cheap way to acquire a gyro, since dual-axis gyros are pretty pricey.

Except when you take it apart, it turns out the gyro is huge:

The gyroscope is the large silver cube. This is no MEMS device like all the other gyros, but some honking steampunk-like device that measures Coriolis effect using electromagnets.

I’m considering talking to Gyration about getting a few OEM samples of their gyro for non-mousing applications. Or maybe just get the datasheet from them and canabilize some Air Mouses.

Speaking at dorkbot-socal, Saturday June 3rd

At the next meeting of the SoCal instantiaton of dorkbot, I’ll be bringing an entourage of Roomba with me and will be demonstrating the hackability of them. Some of the things I’ll be talking about:

– RoombaMidi / Roombas making music
– Roomba Spirographs / Roombas making art
– Roomba as robotics experimentation platform
– What’s needed to hack a Roomba

What: Roomba-a-go-go at dorkbot-socal
Where: Machine Project
When: Saturday June 3rd, 1pm
Why: Know your enemy, the Roombas are ready to revolt

RoombaDevTools RooStick

I recently purchased a RooStick from RoombaDevTools.com. $29 + $6.50 shipping.

If you don’t feel like building your own Roomba serial interface to let you hack your Roomba into a robot, you can use a RooStick.

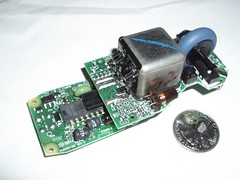
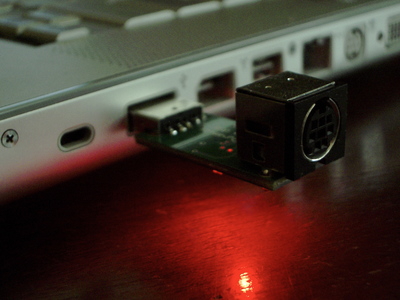
The RooStick is a USB-to-Serial adapter with a Mini DIN 7-pin socket on it that matches the SCI connector on the Roomba. It is an unencased circuit board with a USB connector soldered on one end and the Mini DIN on the other. The circuit consists of a CP2103 USB-to-UART chip and a couple of LEDs.

Here’s what it looks like plugged into my Powerbook:
roostick

While RoombaDevTools doesn’t advertise it because they are focusing on the Windows crowd, the CP2103 has drivers for other OSes. You have to hunt around the Silicon Labs site, but under the
USB-to-UART Virtual COM Port (VCP) drivers
page you can find drivers for all the other OSes. Of course, like all USB-to-serial drivers, they require a reboot.

[update: The SiLabs site doesn’t have a link to Linux drivers because the driver is already in the Linux kernel. It’s called “cp2101” and should auto-load if you have USB hotplug correctly configured (like Ubuntu does)]

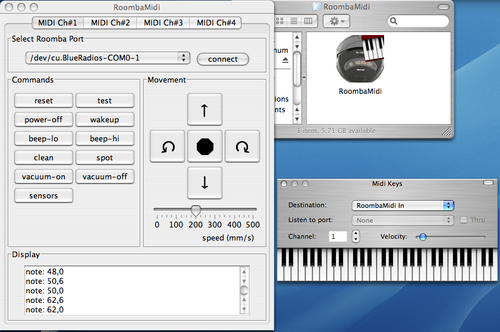
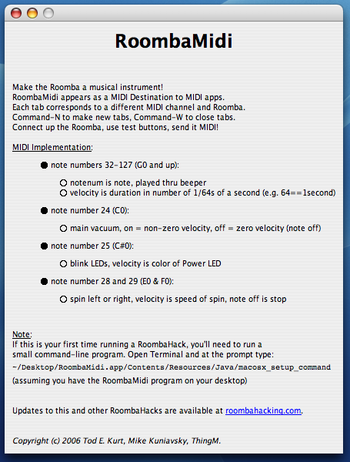
Since it appears as a serial port to your OS, you can use any program that can talk to serial ports to control the Roomba. My RoombaComm API library and any of the apps built on it, like RoombaMidi work with the RooStick.

Issues:
While the RooStick works great, there are a few things to be aware of.

Use their cable
You must use their 7-pin to 7-pin cable. Using a standard Mac serial Mini DIN 8-pin to Mini DIN 8-pin cable from Jameco or wherever will blow out the SCI port on your Roomba. Trust me on this, as I have a dead Roomba to show for it. You could build your own cable, but RoombaDevTools doesn’t yet publish the pinout. From my own experimentation, the pinout appears to be a left-right mirror of the standard Mac pinout. This configuation isn’t guaranteed to stay the same, as RoombaDevTools could change it at any point. Use their cable. Doing so adds $17 to the $29 price of the RooStick but it’s cheaper than replacing your Roomba.

Hot LEDs
The Vpwr LED showing Roomba power gets very (dangerously?) hot. Be careful when grasping the RooStick or you’ll burn your finger. I’ve not measured how much power that LED is drawing. It’s probably not a power concern for the Roomba, but I’m sure the LED’s life is being shortened.

Cable too short
The optional 7-pin cable for the RooStick is only 6 feet long. Even a 10 foot cable is too short if you’re actually driving the Roomba around. I recommend at least a 15 foot cable. The 6 foot cable is only good for stationary Roomba projects, or when the laptop sits on the Roomba.

Other than those issues, the RooStick is a great way of getting into Roomba hacking.

Word of the day: interfaction

interfaction:
An interface that is interacts with you.
portmanteau of interface and interaction.

For interfaces with a touch response, interfaction == haptic. But there are other kinds of interfaction. The ring of LEDs that surround a rotory encoder to show a parameters value, or keys that beep when you press them are non-haptic interfactions.

RoombaMidi: Roomba as MIDI instrument

[Update: an improved version of this idea, called RoombaMidi2, is available on the HackingRoomba.com Projects area.]

The Roomba has a piezo beeper that can play tunes. You’ve heard it.
And its motors make noise. Why not put them under MIDI control?

So here is RoombaMidi: a Mac OS X application that creates a virtual MIDI instrument for use by any Mac OS X MIDI sequencer, like Ableton Live, Logic, and so on.

If you don’t have a sequencer or just want to play with this quickly, grab the awesome and free app MidiKeys. It’s a little virtual MIDI keyboard.

RoombaMidi has the following features:
– provides GUI interface to controlling Roomba (MIDI not required)
– acts as normal MIDI interface to any MIDI application
– supports up to 16 Roombas, one per MIDI channel.
– responds to MIDI notes 32-127 as tones on Roomba beeper,
– MIDI notes 32-127 play corresponding pitch, velocity is duration in 1/64ths-second increments
– MIDI note 24 turns vacuum motor on-n-off for bass drum fun
– MIDI note 25 blinks the LEDs, velocity is color of Power LED
– MIDI note 28 & 29 spins left or right, velocity is speed of spin
– can act as general multi-Roomba test system
– written in Java, but acts like Mac OS X application

To download:
RoombaMidi-0.9.zip
RoombaMidi-0.93-Panther.zip, for Mac OS X 10.3, aka Panther

And if you really want to look at the source…

Here’s what RoombaMidi looks like:
roombamidi1

The about page:
roomba midi about

Here’s one example use:

revver version

Other recorded compositions are forthcoming….

(as always thanks to MikeK for helping with this)

RoombaComm: Roomba Control & Communications API, release 1

This is an updated version of the RoombaComm API.

This release contains Javadoc documentation!

This release further expands on the two different levels of driving API: a lower-level one that is based on velocity, and a higher-level distance/angle one. I’m debating how to notate these differences. For instance:

roombacomm.setSpeed( 100 ); // set speed to 100 mm/sec
roombacomm.goForward( 150 ); // go forward 150 mm
roombacomm.spinRight( 45 ); // spin 45 degrees right
roombacomm.goBackward( 25 ); // go 20 mm backward

vs.

roombacomm.goForwardAt(100); // go forward at 100mm/sec
roombacomm.pause( 1500 ); // wait for 1.5 seconds, so it goes 150 mm
roombacomm.spinRightAt( 100 ); // spin right at 100mm/sec
float ptime = 45.0 * roombacomm.millimetersPerDegree / 100.0;
roombacomm.pause( ptime ); // wait until the Roomba has spun thru the angle

The wacky angle calculation above is the primary reason why I wanted a higher-level API. I want to do more Logo-like things.

ReadyNAS Rules

I recently obtained a ReadyNAS NV by Infrant, on the recommendation of my friend Ben Franco, who’s done much research on large disk arrays. The ReadyNAS pretty much rules. I think my long-standing storage woes may finally be over.

readynas status screen

It’s a dedicated Network Attached Storage (NAS) box that does RAID-0, RAID-1, RAID-5, or a proprietary combo of the three called “X-RAID”. X-RAID allows you to start with one disk, move to two, then three, then four, all without rebuilding the RAID or changing RAID levels.

Continue reading “ReadyNAS Rules”