Or: A good use for old Arduino boards
Like me, you may have a few old Arduino boards or ATmega8 chips (in the boards) laying around from when you were first playing with Arduino. Those chips can still be really useful as the heart of a tiny “Minimal Arduino” setup.
A normal Arduino board contains support components that make it easy to use. If you want a smaller footprint, you can get one of the many Arduino work-alike boards. But if you want a really small footprint, and reuse your old parts, you can make an Arduino board using just five components:
– ATmega8 chip
– single 10k resistor
– single 0.1uF capacitor
– tiny breadboard
– some hookup wire


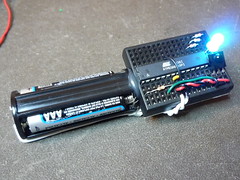
(On the left, an IR remote controlled BlinkM. On the right an IR remote controlled RGB LED)
The Circuit
The minimal Arduino circuit is dead simple. It relies on the internal 8MHz oscillator (like the Lilypad Arduino). And like the Lilypad, it doesn’t include a USB-to-serial. You have to provide that with a FTDI USB-to-serial cable or with an old Arduino board.

Eagle-format minimal-arduino.sch file
Getting the Arduino bootloader into the ATmega8
While the circuit is very similar to a Lilypad Arduino, the chip used is different. The ATmega8 has less memory and must be programmed slightly differently than the Lilypad’s ATmega168.
So a modified Arduino bootloader needs to be programmed into the ATmega8. The bootloader is a small program on the chip that listens to the serial port on power up and can reprogram the rest of the chip if instructed to. Here, a variant of the standard “Arduino NG” bootloader is used. The modifications are:
– uses internal 8MHz oscillator (no external part required)
– serial speed is 38400 instead of 19200 for faster uploads
Files for Minimal Arduino ATmega8 bootloader:
– atmega8_noxtal.zip
Unzip this file into the “arduino-0015/hardware/bootloaders” directory of your Arduino installation to create the directory “atmega8_noxtal”. The zip file contains:
– ATmegaBOOT.hex — the actual bootloader to program
– ATmegaBoot.c — the source code of the bootloader
– Makefile — Makefile to produce & program the bootloader
Actually programming the bootloader to the ATmega8 chip can be done in a few ways. I prefer using an AVRISPmkII programmer and an old Arduino board. Seat the ATmega8 into the Arduino, plug the AVRISP into the 6-pin “ICSP” header, plug both into USB, and program the ATmegaBOOT.hex file. If you are familiar with the command-line, go into the “atmega8_noxtal” directory and type “make isp” to program. If not, you can have the Arduino software program it for you once you tell it about this new kind of Arduino board.
Configuring Arduino to use Minimal Arduino
Because this minimal Arduino setup isn’t exactly like any other previous Arduino boards, we need to tell the Arduino software how to talk to it. In the Arduino directory, there is a file called “arduino-0015/hardware/boards.txt” that does this. Open that file in a text editor and add these lines to it:
##############################################################

atmega8noxtal.name=ATmega8-noxtal @8MHz

atmega8noxtal.upload.protocol=stk500
atmega8noxtal.upload.maximum_size=7168
atmega8noxtal.upload.speed=38400

atmega8noxtal.bootloader.low_fuses=0xe4
atmega8noxtal.bootloader.high_fuses=0xc4
atmega8noxtal.bootloader.path=atmega8_noxtal
atmega8noxtal.bootloader.file=ATmegaBOOT.hex
atmega8noxtal.bootloader.unlock_bits=0x3F
atmega8noxtal.bootloader.lock_bits=0x0F

atmega8noxtal.build.mcu=atmega8
atmega8noxtal.build.f_cpu=8000000L
atmega8noxtal.build.core=arduino
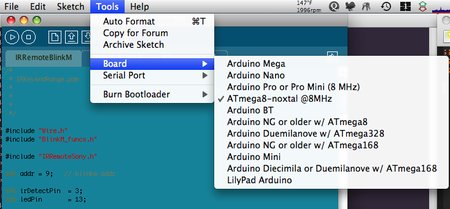
The next time you start up the Arduino software, you should have a new entry of “ATmega8-noxtal @8MHz” in the “Boards” menu. It will look something like this:
From this point you could burn the bootloader onto the ATmega8 chip by going to the “Burn Bootloader” menu and selecting “w/ AVRISP mkII”.
Uploading Arduino sketches
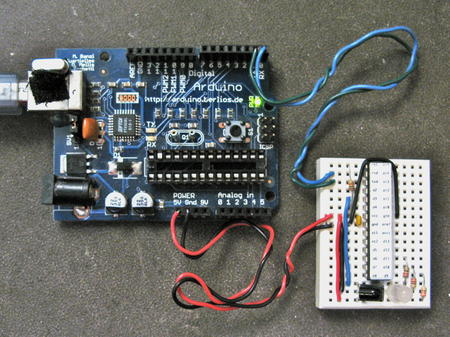
Once the bootloader has been installed, you can leave it plugged into the Arduino board to test it out, or you can remove it and place it on your minimal Arduino breadboard. To upload sketches to it, the easiest way I’ve found is to run a few wires from an old Arduino board to the breadboard:
Links / Resources
This minimal Arduino idea is nothing new. Many others have done similar things. If I could have found an Arduino clone that used an internal 8MHz oscillator on ATmega8, I would’ve used it instead. Some of the pages I referenced:
– Bootloader page on Arduino.cc
– Setting up Arduino on a Breadboard from Tom Igoe at ITP
– Standalone Arduino on the Arduino Playground
– Boarduino from Adafruit
– Really Bare Bones Board Arduino-compatible board from Modern Device
– Arduino Core Hardware page on the Arduino Playground


How hard would it be to use an external crystal or resonator with this? Is there a .hex file to support this? (Sorry I’m new to µC and Arduino)
Lilypad has an external SMD resonator, see schematic here.
I was able to get this working but couldn’t write to the chip a 2nd time without rewriting the bootloader.
my solution was to use the following fuse values:
atmega8noxtal.bootloader.low_fuses=0xd4
atmega8noxtal.bootloader.high_fuses=0xca
and to run a wire to the reset pin through a .1uF cap. the 10k pull up resistor was also causing the chip to not boot at all so I didn’t install that.
Hi Jason,
The ATmega16L is similar enough that you may be able to get the bootloader to work. I just tried recompiling the bootloader above with MCU=ATmega16L and it compiled with no errors, so it might work!
Hi,
very useful information and the circuit is so simple and attractive.
However, I have an old ATMEGA16L, do you think I can use it with the same config as ATMEGA8?
From the spec, they looks so similar.
Thanks!
Reza, the ATmega8 and ATmega88/168/328 have an entirely different fuse layout. It’s confusing, I screw it up all the time. In fact, I think you’re right and perhaps the high fuse should be 0xC0 and not 0xC4. But I just copied the fuses for the ATmega8 setting from Arduino’s official boards.txt
I never got your code to work. Your settings are for a 256byte bootloader, which seems way too small – the atmega168 has a 1k bootloader. I eventually gave up, and used an atmeg168 with the 8mhz version of the bootloader and tweaked the fuses accordingly. I couldn’t get the bootloader to compile under windows 7 to see how big it was, but if you look at the hex file, it looks like it gets loaded in the c00 space which corresponds to the 1k size. anyhow..
Ok, I’ve successfully built a ATmega8 noxtal bootloader from scratch.
I missed that the default makefile in Arduino had the upload speed at 19200, yet you’d updated boards.txt (and presumably your own Makefiles) with 38400. It was there – just didn’t read it carefully enough.
Also, for me the fuses that worked were low=0xE4 and high=0xC2
http://www.engbedded.com/fusecalc is a truly wonderful tool for decoding and experimenting with these.
The difference between xC2 and xC4 is the assertion for how large the bootloader space is, I think? If so, I think 0xC2 is what you want (512 words 0xC2, rather than 256 words for 0xC4)
[Tod – if I’m incorrect and you want to delete this comment because I’m confusing your readers please feel free to do so – but this is what worked for me]
Oh dear, that may explain it. I haven’t been using the burn bootloader option since I figured out the correct fuses… I’d just been trying to Upload Sketch.
-_-
I just checked, and Arduino Burn Bootloader is setting my fuses.
So, now I’ve a new problem. If I’ve got an atmega328p with fuses set up to look for a crystal, and I want to set it’s fuses -and I have no crystal- (just for the sake of argument) is it possible?
Hmm, that’s frustrating. But I’m glad you got it working!
I wonder if the Arduino “Burn Bootloader” menu option doesn’t set the fuses. I wish it printed out exactly what it was doing. Looking at the Arduino source, it appears that it’s programming the fuses, but it’s hard to tell.
hfuse = ca
lfuse = df
:O
I guess the arduino app isn’t using the boards.txt properly? Hm!
Well, I used AVRdude to program the fuses, and now it works without the crystal. Yay!
Now how do I get arduino’s boards.txt to work properly….
Hi J,
That’s a really good debugging step, disconnecting pins 9 & 10 from the crystal. That definitely sounds like the fuses aren’t getting set, so the chip is still in “external oscillator” mode instead of “internal oscillator”.
You can read back the fuses with avrdude by doing the command:
This will place the fuse settings in the files hfuse.txt, & lfuse.txt. If the values don’t match what you expect, program the fuses again using avrdude. For my example above you can use the makefile target “make fuse” or by hand with the avrdude command:
So, I’m using your atmega8noxtal settings. I bent back the pins 9 and 10 on my atmega8-16PU and plugged it into my arduino board. It doesn’t blink led 13. But if I straighten the pins back out, it will blink led 13.
Very frustrating!
:( I’ve tried your atmega8noxtal with l=0xE4 H=0xc4
I program it on the arduino board using USBtinyISP, it programs (no bootloader) and runs (blink led 13). When I move the IC to the breadboard, it fails to run at all. Sigh.
Pin1 – 10k R connected to 5v rail
Pin 7 – 5v rail
Pin 8 – Gnd
Pin 19 – Led Positive leg
Pin 22 – Gnd
104 ceramic cap connected to pins 7 and 8
I’ve really hit a wall of confusion
Yup, that’s exactly it. The “boards.txt” file contains the fuse settings and everything else needed to create and use a particular Arduino variant. So search through boards.txt, find an entry that’s most like your implementation, copy it and rename it. Then make any edits you need. This is what I did above for the “atmega8noxtal” case.
In your ATmega8 case, you should be able to use my “atmega8noxtal” exactly, with no copying.
For your ATmega328 case, you probably want to copy (or just use directly) the “lilypad328” entry, since the Lilypad is essentially a minimal Arduino with a ATmega328.
@todbot: regarding fuse settings
So can I do that in /hardware/boards.txt?