
![]()
The notes for the fourth and final class are up on the Spooky Arduino class page. At the end of the class, Mark of Machine Project bestowed upon each of the students a merit badge. It was great. Click above for a larger view of the badge.
Arduino MIDI Drum Kit and Spooky Sound Trigger
Here’s a quick project using techniques from this week’s class that turns an Arduino board and a few buttons and piezos into a MIDI drum kit or scary sound trigger. Hide piezo sensors around the house during your Halloween party to trigger scary sounds when people walk around!
Hardware
The hardware is an Arduino board with a MIDI jack, a few buttons, and two piezos attached to it. It runs off of a 9V battery.
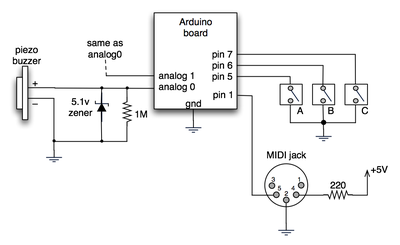
(Note: depending on what kind of MIDI connector you’re usign (jack or cut-off cable), you may need to swap the connections to MIDI pins 4 & 5).
For the piezo input, the 1M resistor is to bleed off the voltage generated by the piezo when it is struck. The 5.1v zener diode is there to insure any large voltages don’t make it into the Arduino and blow it out.
Arduino code
The code has a few tricks that may not be immediately obvious. First is that to implement a MIDI interface, all you really need is the ability to send serial data at 31,250 bps. This is easily done with “Serial.begin(31250)“. Once that is done, a complete three-byte MIDI note-on message can be sent with three “Serial.print(val,BYTE)” commands.
The next tricky bit is that the switches in the above schematic don’t need pull-up resistors. This is because the internal pull-ups in Arduino’s AVR chip are turned on with a “digitalWrite(pin,HIGH)“. This may seem counter-intuitive, doing a digitalWrite() on an input pin, but it’s how the AVR works. The benefit is that you no longer need a resistor to +5V and the effort to wire up each additional button is much lower.
The final trick is measuring impact force on a piezo. When piezo elements are struck, their output voltage rings, sort of like a bell. Kind of like this:
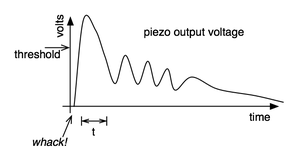
By measuring the time it takes for that first big jolt to cross a threshold, you can get an idea as how big the force was. In the code this is represented by reading the analog value and if it’s over the threshold, wait until it drops down again, counting all the while. When I’ve done this before, I used an input opamp to convert the analog signal to digital (thus doing thresholding in the analog domain) and then used interrupts to get very accurate force measurements.
Arduino code: midi_drum_kit
Hi Todbot,
I’ve built the MIDI drumkit following your steps. It’s working fine, but my arduino keeps resetting when I hit the piezo hard, and I think it’s the lack of the zener diode that is causing this (I only added the 1M resistor). I went out to buy the zener and asked for a 5v zener, but I also need to know how many watts, so I can pick the right one (or it’s code), because they have a bunch of 5v zeners there. I’m no expert in electronics, so which 5v zener should I buy (it’s power or code).
Thanks in advance,
Fergo
todbot,
Thanks for teaching us how to do this!
I built a programmable MIDI drumkit based on what I learned from you. I thought it would be fun for you to see what others have done with your idea. Thanks again!
http://g33k.blogspot.com/2010/03/programmable-midi-drumkit-i-dont-have.html
Hi Keith,
If you connect to your Arduino with the Arduino Serial Monitor, does the LED on the Arduino blink when you press the switches?
If they do (or if you think maybe you can’t tell), a common thing to try with DIY MIDI is to swap the connections to pins 4 & 5 on the MIDI jack.
If that doesn’t work, try commenting out all the piezo reading code, so you just have switches. It may be the analogRead()s are picking up something from the piezos that make it not work. Once you get switches working, you can try adding back in the piezo parts.
Hi Guys
I need some help to get this working. Arduino seems to load sketch ok and I have been able to get MIDI-out to work into drum machine using other sketches so I think my wiring is OK. Do I need to enable something or is further code required to be added to the sketch?(Using Midi_Drum_Kit)
There is no MIDI (or serial output on monitor) from either switches or Piezo inputs!!
Any ideas appreciated.
Thanx
Keith (newbie)
Awesome, Thanks for the post – I’ve just started playing with piezos and this has proved to be great inspiration!
Hey thanks for great tutorials, I am using the USB to connect the arduino to my Mac. I keep getting piano sounds when I run it thru garageband even when I change the instrument. Is there something in the sketch I should address?
Hi Alessio,
Yes, in theory because there is that spinloop, there is the possibility of large delays between notes (“flam”). In practice, the pulse from the piezos is usually very short, on the order of a few microseconds. The “delay(t)” in the code between noteOn and noteOff is probably not necessary for most sound modules in drum trigger mode. I just did it because I come from the land of old MIDI hardware where that wouldn’t work. ;)
If you are concerned about the delays though, the sketch could be changed so instead of doing a spinloop and delay, it maintains an “is_triggered” state for each piezo, then checks and increments an individual “t” value for each piezo. Then you read all the piezos at once, and then decide to send midiOn or not.
Thanks for the reply!
I was thinking to the worst case: when you hit two pads exactly at the same time or with a few microsecond delay . so i suppose that the piezo pulse (from threshold to threshold ) is a few millisecond long, right? .The code scans the first analog input, wait for a “t” time , send a midi on note, then wait for a “t” delay and then a midi off note. after that repeats the same procedure with analog input 2 … so after hitting a pad there’s at least 2t delay. In the worst case i mention above the second hit is completely lost. I am missing something? maybe i’m too much pessimist, maybe the worst case happens very very rarely.
thanks, bye!
Hi Alessio,
Yes, the code scans just one at a time, but it does it very quickly so you can get the appearance of simultaneity. So set your MIDI sound module to “drum trigger” mode (or increase the release time) so that the MIDI messages generate sustaining sounds on your sound module.
Hi!
very very good project!
I have just one simple question. Is this module polyphonic?
if i understand correctly the code the arduino scans just one analog input at time…
thanks, bye!
Hey!
I was looking for electronic drums in the DIY domain, and I found Wyatt’s work. After a while I also discovered yours and found it really inspiring, and so I started my own implementation.
Since there are people asking, there is a way to interface arduino with MIDI and Linux, through USB and no additional hardware, through ttymidi [1]. This is the road that I follow, and you can also check my progress in my blog! [2]
I believe that there are plenty of audio software solutions available for Linux, although it is still tricky to succeed in configuring everything smoothly.
-prf
[1] – http://www.varal.org/ttymidi/
[2] – http://www.prfbase.com/porfyros/2010/01/e-tampourlo/
Ive been researching the possibility’s of serial to midi data sending and this has proven to be extremely usefull.
Ive succesfully connected 1 pot using a arduino mega, s2midi and midi yoke to ableton live. Although there was some latency it was barely noticable. The thing is, I want to use around 16 pots and 16 switches. Since my programming skills are far from perfect, ive run into some problems hacking the attached analogcc code from s2midi to accept multiple pots on different analog pins. Is there anyone who has tried this before and would like to share their code?
here is the original code from their website:
// Example of Arduino feeding S2MIDI CC messages

int midiChannel = 9;
int outPin = 13;       // the number of the output pin
int analogPin = 5;

// Analog smoothing stuff
int lastAnalog = 0;
int analogSmooth = 2;  // Amount of change needed to send control change

void setup()
{
  Serial.begin(9600);
}

void loop()
{
  int reading = 0;

// Do analog line
  reading = analogRead(analogPin)/8; // change 0-1024 into 0-127
  if (abs(reading-lastAnalog) > analogSmooth) {
    lastAnalog = reading;
    controlChange(midiChannel,10,reading);  // Send CC10
  }
}

// Send a MIDI control change
void controlChange(byte channel, byte controller, byte value) {
   midiMsg(channel+0xB0, controller, value);
}

// Send a general MIDI message
void midiMsg(byte cmd, byte data1, byte data2) {
  digitalWrite(outPin,HIGH);  // indicate we're sending MIDI data
  Serial.print(cmd, BYTE);
  Serial.print(data1, BYTE);
  Serial.print(data2, BYTE);
  digitalWrite(outPin,LOW);
}
Also, there have been several references to little-scale’s blog and I’ve been particulary interested in this entry:
http://little-scale.blogspot.com/2007/11/more-pots-and-switches-to-midi-data.html
maybe sometime…
Hi rgm,
Linux is notorious for having poor infrastructure for audio and MIDI-like data. (speaking as a long-time Linux laptop user)
I suspect the easiest approach would be to have a small program that sits on the Arduino’s serial port and sends/receives OSC messages. Many audio programs support OSC, which is kind of like MIDI over UDP if you’ve never heard of it. OSC is nice because it’s very simple and very flexible. And just look at all the stuff people have built for OSC.
In the spirit of open source and small resource consumption, do you know a way to trigger sound samples on GNU/Linux with MIDI events with a small command line program? Short of compiling my own SoundFont, I was unable to find anything small that would work well head-less or on embedded systems like the NSLU2. For larger systems, these packages (in conjunction with a properly configured MIDI->USB gizmo) seem like they would work:
http://www.hydrogen-music.org/
http://ardour.org/
Of course there are many ways for an Arduino to signal a computer (serial, ethernet, midi…), but I’m specifically interested in using MIDI messages for a velocity-sensitive soundboard (fartbonker-type) application, while not spending $500+ on proprietary software.
I can see why Ladyada made the WaveShield — compact, low power, low-resource audio is a PITA with Arduino.
Hannes, are your pushbuttons wired up exactly as in the diagram in the post? The sketch expects them wired up so a LOW indicates a button press.
What a great project.
I just have a little problem. When I press the pushbutton the sound stops and if I release it, it plays. So kind of upside down. Even if I exactly use your code.
Can anybody help me?
Thanks.
Hi Sebastian
Thanks for sharing!
Although I didn’t understand this part of your code- could you assist please?
“….if(val 127)….”
and
“…noteOn(drumchan,note_bassdrum, output)….”
(what is the output in this case?)
Thanks, and great work todbot!
Hey.
Thanks for the code to this piezo trigger!
I’ve actually made it better and I wanted to share that with you all.
I’ve commented the code as good as I’m able to.
One thing though: It does not send an OFF message to Logic, or Logic does not interpret it that way, it just interprets it like a zero velocity hit. Don’t know why, really.
Please get back to me if you have the answer.
Anyway, this works perfectly for me:
// what midi channel we're sending on
// ranges from 0-15
#define drumchan           1

// general midi drum notes
#define note_bassdrum     36

// define the pins we use
#define piezoAPin  0
#define ledPin     13  // for midi out status

// analog threshold for piezo sensing
#define PIEZOTHRESHOLD 80

int val;
int output;

void setup()
{
  pinMode(ledPin, OUTPUT);
  Serial.begin(31250);   // set MIDI baud rate
}


void loop()
{
  static int prevval;

  //read analog signal from piezo.
  val = analogRead(piezoAPin);

  //if the analogue value exceeds the threshold, engage the if statement.
  if(val>=PIEZOTHRESHOLD)
  {
    //add the value to a static variable to keep the previous analogue read value from last loop repetition.
    prevval+=val;

    //when the previous value is larger than the current value, we've detected a peak in the analogue signal.
    if(val 127)
      {
        noteOn(drumchan,note_bassdrum, 127);
      }
      //in all other cases, the value will be the calculated value.
      else
      {
        noteOn(drumchan,note_bassdrum, output);
      }
      //when MIDI output is set, deactivate the MIDI signal again and reset the 'previous' value to 0 to be ready for a new peak.
      noteOff(drumchan,note_bassdrum,0);
      prevval=0;
      //and finally a short delay for not overflowing the UART.
      delay(100);
    }

  }
}