The notes for the fourth and final class are up on the Spooky Arduino class page. At the end of the class, Mark of Machine Project bestowed upon each of the students a merit badge. It was great. Click above for a larger view of the badge.
Arduino MIDI Drum Kit and Spooky Sound Trigger
Here’s a quick project using techniques from this week’s class that turns an Arduino board and a few buttons and piezos into a MIDI drum kit or scary sound trigger. Hide piezo sensors around the house during your Halloween party to trigger scary sounds when people walk around!
Hardware
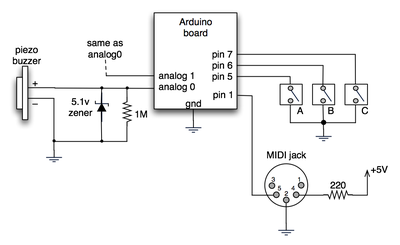
The hardware is an Arduino board with a MIDI jack, a few buttons, and two piezos attached to it. It runs off of a 9V battery.

(Note: depending on what kind of MIDI connector you’re usign (jack or cut-off cable), you may need to swap the connections to MIDI pins 4 & 5).
For the piezo input, the 1M resistor is to bleed off the voltage generated by the piezo when it is struck. The 5.1v zener diode is there to insure any large voltages don’t make it into the Arduino and blow it out.
Arduino code
The code has a few tricks that may not be immediately obvious. First is that to implement a MIDI interface, all you really need is the ability to send serial data at 31,250 bps. This is easily done with “Serial.begin(31250)“. Once that is done, a complete three-byte MIDI note-on message can be sent with three “Serial.print(val,BYTE)” commands.
The next tricky bit is that the switches in the above schematic don’t need pull-up resistors. This is because the internal pull-ups in Arduino’s AVR chip are turned on with a “digitalWrite(pin,HIGH)“. This may seem counter-intuitive, doing a digitalWrite() on an input pin, but it’s how the AVR works. The benefit is that you no longer need a resistor to +5V and the effort to wire up each additional button is much lower.
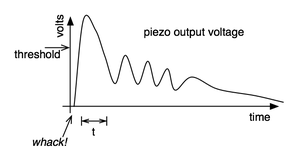
The final trick is measuring impact force on a piezo. When piezo elements are struck, their output voltage rings, sort of like a bell. Kind of like this:

By measuring the time it takes for that first big jolt to cross a threshold, you can get an idea as how big the force was. In the code this is represented by reading the analog value and if it’s over the threshold, wait until it drops down again, counting all the while. When I’ve done this before, I used an input opamp to convert the analog signal to digital (thus doing thresholding in the analog domain) and then used interrupts to get very accurate force measurements.
Arduino code: midi_drum_kit


Hi. I have Arduino Uno R3 board. But this Project code not work my board. Help me please.
Hi Pal!
I was sufing the web looking for some coding to handle piezzobuzzers with arduino, and I actually love your coding! I struggled with the “second threshold” issue with millis(), but your idea is awesome!
I know that this post is way old, but mate if you check this i want you to know that it’s helping a lot. I’m hacking a Guitar Hero Drumkit into an Arduino MIDI controler and as soon as i get it working with this improovements, i will tell here.
I’m checking all this site. Congratz and keep making cool proyects! :)
Grim
Hello,
I’ve correctly soldered and programmed my drum kit as well,but when i hit the pad it triggers multiple midi notes, not only more than one, it triggers the same midi notes…do you know wy?
Trying to do something similar, but with 2 analog inputs. I have connected 2 piezos each with a 1M resistor in parallel. I skipped the diode (which may be my problem).
When I am receiving an input on analog0, I get an input read of about 1/4 of the value on analog1 – even if nothing but the 1m resistor is connected to analog1 – so it is not xtalk form the piezo. It seems like the signal on analog0 is bleeding over to analog1. will the diode take care of this?
It should work if the pads in the rockband drum kit are just switches.
Hi wondering the same as maax555 here. Don’t seem to find anyone who has actually done it but it should work no? I’m just to lazy to build the pads so I thought I’d get a cheap guitar hero/rock band drum kit off of ebay and mod it. Any thoughts?
Sorry, also wanted to ask about latency as I would be using to connect into home studio for adding drums in real time.
thanks
Hi, a couple of things,
1) could i build this into a set of Guitar Hero Wii drums (i dont use them anymore) and simply use the pads as piezo’s?
2) How would the same thing be achieved using the Uno R3 USB for midi out (and power in)?
thanks maax