
Setting up a Bluetooth serial adapter like the SparkFun BlueSMiRF isn’t very hard, but not very intuitive.
Bluetooth supports many “profiles” for doing various things (phone headset, address book syncing, file exchange, etc.) One of these profiles is the “COM” profile and is a simple serial port: raw binary data transmit and receive. That’s the profile these Bluetooth serial adapters speak. All Bluetooth stacks on computers appear to support the COM profile.
The SparkFun BlueSMiRF module speaks only the COM profile and when powered on and set up, looks just like a normal serial port to software. In truth it looks a little like a modem, because you can escape into a “command mode” that has an AT-compatible configuration language.
The full steps are below.
Step 0: Plug in / power up your BlueSMiRF Bluetooth-to-serial adapter
This is application-specific, but do whatever you need to do to get the Bluetooth adapter hooked up to your gizmo you want to wirelessly control and give it power. For the Roomba, I’ve created a few Bluetooth interfaces.
Step 1: Turn on Bluetooth and start Bluetooh Setup Assistant

Open Bluetooh Preferences, turn Bluetooth on the “Settings” tab, then select the “Devices” tab and click the “Set Up a New Device” button. For type of device, choose “Any Device”. Click “Continue” to begin scanning for the Bluetooth serial adapter.
Step 2: Device found
The device should be found within a few seconds. At first you’ll see its Bluetooth address and then that will change to be the name of the adapter. This name is not unique and all BlueSMiRF modules will probably have the same name. (all three of mine had “BlueRadios”)
Step 3: Pair with adapter

Bluetooth devices usually exchange a secret key called a PIN. By default, the BlueSMiRF’s PIN is the string “default”. So tell the Mac that and continue. (You can change the PIN later if you want by using the BlueSMiRF’s “AT” commands)
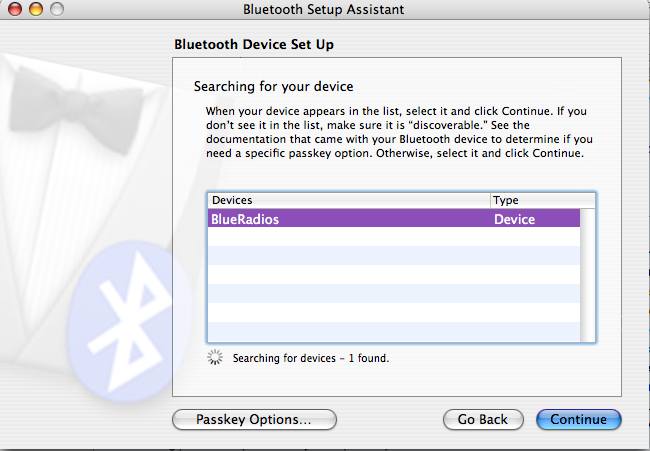
Step 4: Look at Bluetooth Setup Assistant be confused

If the pairing was successful, you’ll get the above screen. Don’t worry, everything is fine. Bluetooth serial adapters are rare enough that the wizard doesn’t have a case for what to display. Just click “Continue”.
Step 5: Observe your handiwork

You should now have a “BlueRadios” device in your device list. Select it and click “Edit Serial Ports…”.
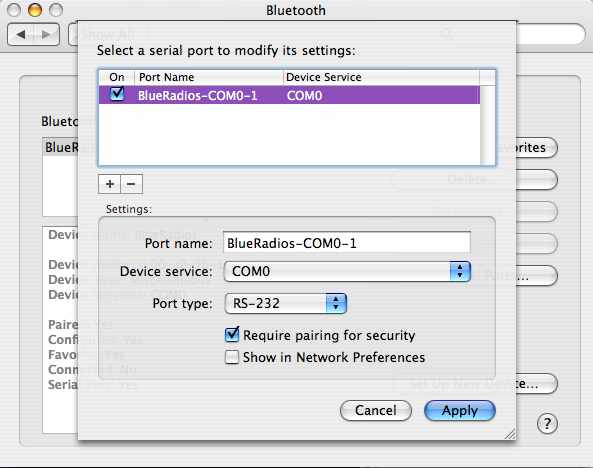
Step 6: Configuring Serial Ports

As you can see, the serial port is already set up for you the way it should be. The only thing to add is to tick “Require pairing for security” since I think the BlueSMiRF modules may require it. [note: test this again]
Now you have a working Bluetooth serial port. You can access it with any program that speaks to serial ports. One of the best GUI programs to do this is ZTerm.
Step 7: Launch ZTerm and Pick your Port

When launching ZTerm, hold down the Shift key so you can select a port. Select the port you saw in the previous step. It should be “BlueRadios-COM0-1”.
Step 8: Configure ZTerm

Set up ZTerm like above. 57600 bps, 8N1 is a good speed (and the speed the Roomba talks at, if you’re doing Roomba stuff). The “Local Echo” is so you can see what you type for the steps below, because the BlueSMiRF doesn’t echo back.
The actual speed you set here doesn’t change the physical speed at the RX/TX wires of the BlueSMiRF. For that we need to go into command mode and change some of BlueSMiRF’s parameters.
Step 9: Configure BlueSMiRF

The BlueSMiRF should power up in “data mode”, that is, it’s like a virtual cable with nothing in between. You can command it however to change how it behaves.
Just like an old AT-compatible mode, you enter command mode with “+++” and pressing Return. It should respond with “OK”. To verify, type “AT” and Return again, and it should again respond with “OK”. Now type “ATSW20,236,0,0,1”. This magic incantation changes the speed and other serial paraemters of the other ‘side’ of the BlueSMiRF (i.e. the RX/TX lines plugged into whatever, like a Roomba) to 57600 8N1. This needs to be done because by default, it comes up at something like 19200 bps.
If you’d like the details on how to switch to other speeds and all the other magic parameters, either contact SparkFun or BlueRadios (the makers of BlueSMiRF’s heart)
Step 10: Finishing up

Put the BlueSMiRF back in data mode with “ATMD” and then you’re done. It should come back up in data mode automatically on powerup. If you find it’s not coming up in data mode, enter the magic configuration incantation “ATSW25,0,1,0,0“, wait for the “OK” response and try again.
If you’re unix-saavy, you can see the serial ports along with all the others by doing an “ls /dev/cu.*” in the Terminal. And if you know how to write code to speak to serial ports, just use /dev/cu.BlueRadsio-COM0-1 as the serial port.
Hi Rva,
I don’t know much about blueconsole, the site that Larry cooke points to looks like a scam site now. It looks like this site is a mirror of what used to be on it:. http://www.conserver.com/consoles/BlueConsole/
As for pairing an iPad with a BlueSmirf, I don’t think that’s possible unless the iPad is jailbroken. By default iPads don’t support the Serial Port Profile (SPP) of Bluetooth that the BlueSmirf implements.
However, there are Bluetooth modules out there that do HID profile, and there might be a way to get the BlueSmirf to go HID too.
Hi and specialy Larry Cook.
Do you or does someone know where i can find more info about blueconsole?
I do get a stupid metalwallet website in dutch!,
Also, is it posible to pair an iPad with a BlueSmirf?
Hi and specialy Larry Cook.
Do you or does someone know where i can find more info about blueconsole?
I do get a stupid metalwallet website in dutch!,
Does anybody know how to do the same proceedure for Windows 7 or XP Prof??
any comment or link would be useful!
My Mac OS X 10.6 ask for a passkey to use fo the modem. I just select “dont use a passkey with this device”. But then when I try to connect to it using screen, a dialog for pairing comes up for me to enter a pass key. So I enter “default” but it doesn’t want to pair and screen ends up saying the “device is busy” and closes.
Great!..thanks a lot for this setup guide, I got this serial Bluetooth adapter:
http://www.usconverters.com/index.php?main_page=product_info&cPath=65&products_id=228
and it works perfectly fine following this guide.
Thanks TodBot, I’m going to be playing a lot with bluetooth over the next few months, and thanks to you I’ve taken the first steps (hooked up to my BT GPS unit and extracted my position from the serial port!). Really great article!
Also check out the BlueConsole Bluetooth serial adapter. This product has complete documentation for Mac OS X, and also is able to power itself from existing RS232 handshaking leads. You can find info and Mac OS X documentation at http://www.blueconsole.com
RE:
‘There is another issue with panter. After I changed the key I tried to setup the serial port. But under panter the required button is missing.’
In step 6 above, Panther does not allow you to “edit serial ports” so you can access the “Bluetooth Serial Utility” found in your “/Applications/Utilities” folder. You can then select “new” and set up your serial port.
Select your BlueRadio device and click “edit” then set your “port type” to RS-232″
Thanks for the heads up, I might expand on this a bit at some point. The crucial bit was “Edit Serial Ports…†– which created the alias under /dev/.
I used ATSW20,472,0,0,1 for 115.2k and ATSW20,944,0,0,1 for 230.4k. Note the ‘1’ at the end permanently stores the change in flash, so it’s best to leave it out when testing ;)
Excellent. Just what I needed to get past the “Tiger gets confused” part. :-) Thanks
-Martin
I’m having difficulty getting this to work correctly on my Mac. I have done the above steps, can set the baud rate, and put it into Data mode. Though what’s odd is that despite whatever baud rate I set it to, I can still do AT in any other baud rate set in ZTerm.
Anyways, I then Hang-up and quit ZTerm and open the RoombaMidi. It connects, but when I try to get sensors, RoombaMidi complains “couldn’t read Roomba. Is it connected?”.
It’s an older Discovery with firmware upgraded with the scheduler upgrade kit. All the lights come on the Roomba when I plugin the RooTooth, so the firmware should be good enough.Â
Any ideas?
There is another issue with panter. After I changed the key I tried to setup the serial port. But under panter the required button is missing.
You can also use iStumbler to pair with non-numeric passkeys on Panther (10.3).
FYI: Looks like this requires “Tiger” on the Mac. My Pather box will only accept numbers when entering the “passkey”. I’m going to use a Tiger box later and change the passkey to be numeric only and try again.