
Note:
This post is pretty old and I’ve been continuing work on Roomba software.
Note:
For a more readable take on this, see this Makezine artcicle
A week ago I got my OSMO//hacker Roomba firmware updater from iRobot. It worked like a charm, giving me a serial port to fully control the Roomba.
An interface was needed however, since the crazy mini-DIN 7-pin on the Roomba is very unstandard. So the first attempt at a robust interface between a Roomba and a standard PC serial port is my Roomba Serial Interface:
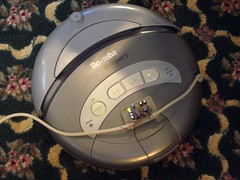
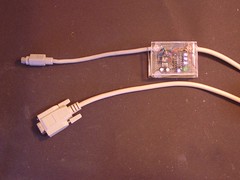
The Roomba Serial Connector
It seems people are confused by the mini-DIN 7-pin connector, citing difficulties in obtaining that specific plug. It turns out that mini-DIN 8-pin plugs will mechanically mate with the 7-pin jacks, with the center key hole in the 7-pin female jack taking the middel pin of the 8-pin plug. Mac high-speed serial cables from the 1990’s work great for this, and I have a ton of those from all my misspent youth doing MIDI on a Mac. So chop up those old Mac serial cables! If you can’t find one, Jameco will sell you one for $3.29.
The PC Serial Connector
Some computers have an RS-232 serial port. Most don’t. To hook this serial interface cable up to your Mac or other modern computer without an RS-232 port, use a Keyspan High Speed USB Serial Adapter. Supported on all platforms and the choice of Mac hardware-hackers worldwide.
Step-by-Step Construction details
If you’d like to build your own interface but don’t quite know where to start, I took a few images of the process I used.
The Software
With the Keyspan adapter and the Roomba Serial Interface, all the hardware is present to control the Roomba from a computer. All that’s required is software that can connect to serial ports and send and receive binary data. The Roomba SCI protocol isn’t text-based, so you can’t really use a normal terminal program like ZTerm (Mac) or HyperTerminal (PC).
My goal was to create a program that allowed one to remotely control all aspects of Roomba functionality as well as getting all information from the Roomba’s sensors.
It would be nice if the worked on multiple platforms. While I initially started in C, the difficulties in non-programmers getting C code to work on many platforms made me leery of that choice. And C doesn’t provide a consistent GUI framework on multiple systems. It turns out that Java has pretty good serial port functionality now (provided by RXTX), and Processing provides a good cross-platform environment for writing graphical Java programs.
I created a Roomba communication API in Java and a GUI in Processing that shows a top-down iconic view of the Roomba universe. The API is called “RoombaComm” and the GUI is called:
RoombaComm_tst
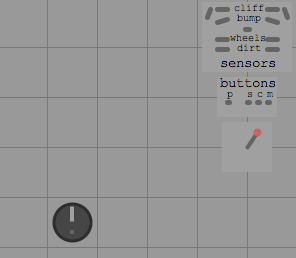
It provides the following capabilities:
- Detect a Roomba and display Roomba status
- Remotely control the Roomba like a little tank
- Read and display bump, wheeldrop, cliff and dirt sensors
- Display angle and velocity data from the Roomba both numerically and iconically
- Start and stop vacuum on the Roomba
- Play notes on the Roomba using the computer keyboard as a musical keyboard
- Display Roomba button press status
The software is still very rough and not very well structured nor documented. However if you have a Roomba serial interface and want to play with it, it can be downloaded at:
Trying it out
In the zip file above, there are executables for Mac OS X, Windows, and Linux. I’ve only tried the OS X one. Give one of them a try and see if it works for you. If not…
To use it inside of Processing:
- Download and install Processing
- In the Processing document folder (“Documents/Processing” on Mac or “My Documents/Processing” on PC), unzip the above zipfile. It should create a directory called “roombacomm_tst”
- Launch Processing and choose File->Sketchbook->roombacomm_tst to open the program
- Click the Play icon to compile and start the program
- RoombaComm_tst will then give you a list of serial ports, pick the serial port that you’ve plugged the Roomba in to. On Mac OS X, there are both “/dev/cu.blahblah” and “/dev/tty.blahblah” serial ports. Always choose the “/dev/cu.blahblah” ports. On PCs, it will be whatever COM port number you’ve selected. On my Mac, the Keyspan adapter is “/dev/cu.KeySerial1” and on my PC, the Keyspan adapter is “COM6”.
- RoombaComm_tst will open that serial port and attempt to talk to the Roomba. If it is not successful, it will display “status: no roomba”.
- If it’s succesful, drive the Roomba around with the arrow keys, play tunes with the “asdf…” keys and so on!
Here’s what it looks like when just playing around:
Let me know if you try this out and give me feedback on how it works for you.
Update:
Hey:
The roomba SCI commands don’t use normal ASCII text based strings, however theoretically you should still be able to use hyperterminal by sending down equivalet text that corespond to each command. I use realterm, which makes things a bit easier to work with however.
If you just want to first try to send a few commands to the roomba before running the java program (to rule out issues within the program), I’d recomend downloading realterm, connecting to the roomba via your serial link and just send the roomba a few simplistic commands.
This is a good walk-through that describes the process, and should take you 5-10 mins to get it working:
http://www.robotappstore.com/Knowledge-Base/1-Introduction-to-Roomba-Programming/15.html
Try to make the roomba beep or something and then progress from there. One thing to note is that different roomba models use different baud rates, and hence the program you are using may not work with certain types of roombas.
Hope this helps!
Hey Alex,
The SCI command connection can sometimes be a bit tricky. I know that if the roomba is not re-set into the proper mode when you are done messing with it – it will disable all the buttons – and hence might not act you suspect. I would recommend reading over this writeup:
http://www.robotappstore.com/Knowledge-Base/3-Serial-Port-Baud-Rate-Configuration/17.html
It give a good overview of the SCI communications as well as covering some of the more odd issues.
hope this helps!
Alex, you should check out
http://hackingroomba.com/code/roombacomm/
It talks about the new maintainers of the Roomba code. They updated it for the newer Roombas.
Software doesn’t work on my 560 pet series. It says no roomba detected, however the arrow keys toggle the spot button. Space makes it stop. Nothing else appears to work. Did roomba change the com language?
Hi!
I have a White Roomba Discovery and I wonder that if it is controllable by PC. I made a RS232 serial tether (I didn’t use Keyspan)and connected to COM1 port. But I cannot connect to the Roomba.
Is there any problem?
Is White Roomba Discovery programmable?
Tks in advance!
HI TodBot!
I’am using your serial teather and it doesn’t seem to work I’ve tryed every connection and run your java application ( witch works very nicely ) but i can’t seem to send anything to the roomba. The Roomba is on and i have a green light on the serial teather. And i know my USB serial connector works. I have also tested my circut about three or four times but can’t get anything back from the roomba. Now i might need a OMSO upgrade but i think the Roomba Discovery White is just fine for the Upgrade but the other thing that might be the problem is that i have a new mother board witch i had to replace. So…i Would really like to have the Roomba working because I think robotics is cool.
Hi Todd,
I just bought a used Discovery 4210 off E-bay and I’m confused on one point. With the process you describe here, do I need to use the OSMO/Hacker firmware updater before I can run your RoombaComm API? Or can I just make the interface board and use the API directly? Thanks for your advice.
I have the Roomba here with me in case there is something I need to check. I can see I need to install a new battery pack.
Thanks
Bob